

We do not directly offer cPanel, but we highly recommend cpaneldirect.net (you would need a “External VIZZO (VZ/OpenVZ)” license).
What happens when I am out of bandwidth?
You will not incur any overage charges. Instead, your VPS will be automatically suspended until the end of the month. You will be able to upgrade to a better package at any time and resume using your VPS if you have to do it before end of month.
How to change billing cycle?
Changing billing cycle
It is possible to modify billing cycle without having to contact support. Please note, however, that if you have already received the renewal invoice, then the system will not allow making any changes until the invoice is paid. New invoices are generated on the Renewal date, which can be verified by following this link: GO
How to change billing cycle
Billing cycle can be changed on the following page:
GO
Locate service you’d like to modify and click [modify] link in the Renewal Date column. Changes will be saved immediately.
Keep in mind that the changes only apply to future billing. It is not possible to make retroactive changes to already issued and/or paid invoices.
Troubleshooting network connectivity issues
So you have just found out that you no longer have access to your VPS. Let’s find out what is causing the issue. We will be using ping.pe for our troubleshooting.
Normal output
Here is what a normal output of ping.pe looks like:
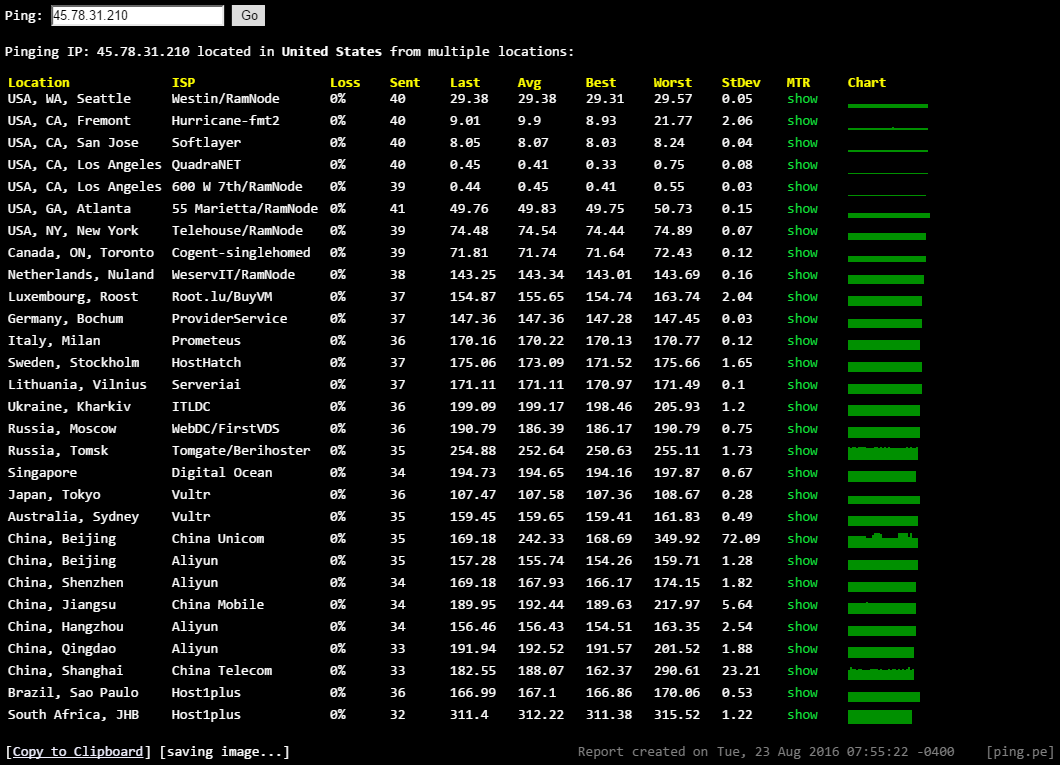
The above output shows that the VPS is accessible from all parts of the world. If you are seeing this output however you are still unable to connect to your VPS, then most likely there is a software configuration issue which you can solve by using the Interactive Console in KiwiVM.
No connectivity at all, complete blackout
The output below shows 100% packet loss from all locations, meaning your VPS is completely inaccessible:

First of all, use KiwiVM to verify that your VPS is actually running.
Next step, verify your firewall configuration. The following article explains how to do that:
If there are no issues with firewall, then most likely there is an issue with the network configuration inside of your VPS. The easiest way to solve these issues would be to perform an OS reinstall. You can also use the Interactive Console in KiwiVM to troubleshoot such issues, however specific steps fall beyond the scope of this article.
Slow connectivity, packet loss
Here’s what packet loss looks like:
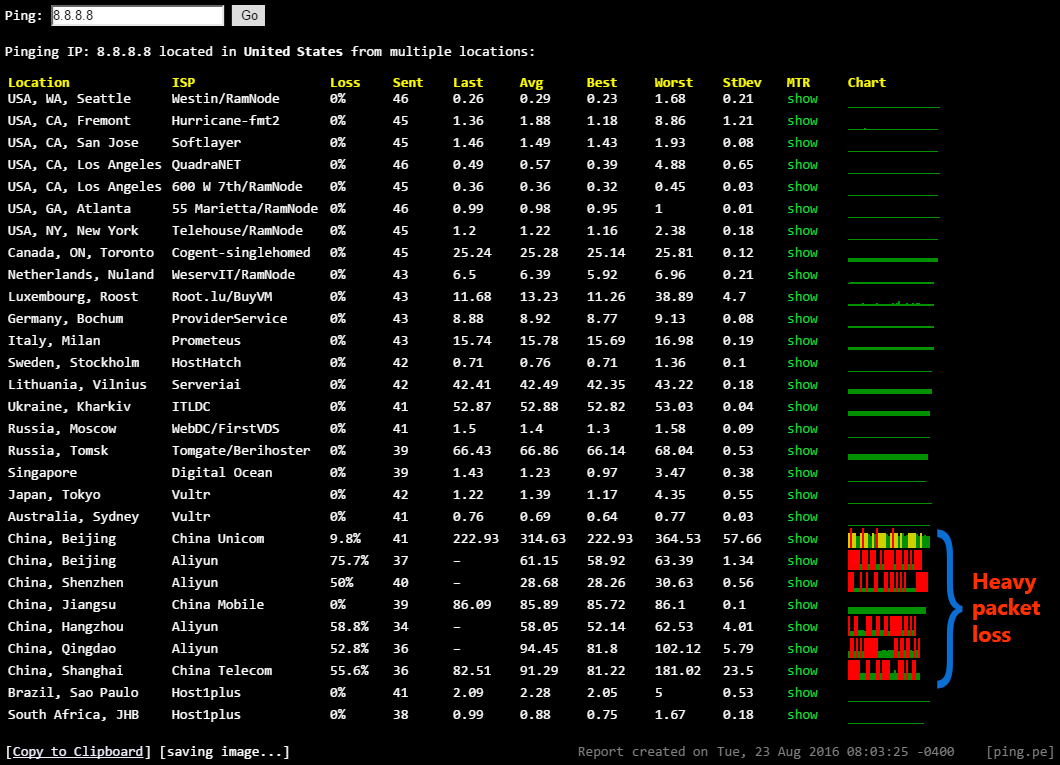
In this particular example we can see that there is heavy packet loss to 8.8.8.8 from all China locations (except one). To further diagnose the issue open up the full mtr report:
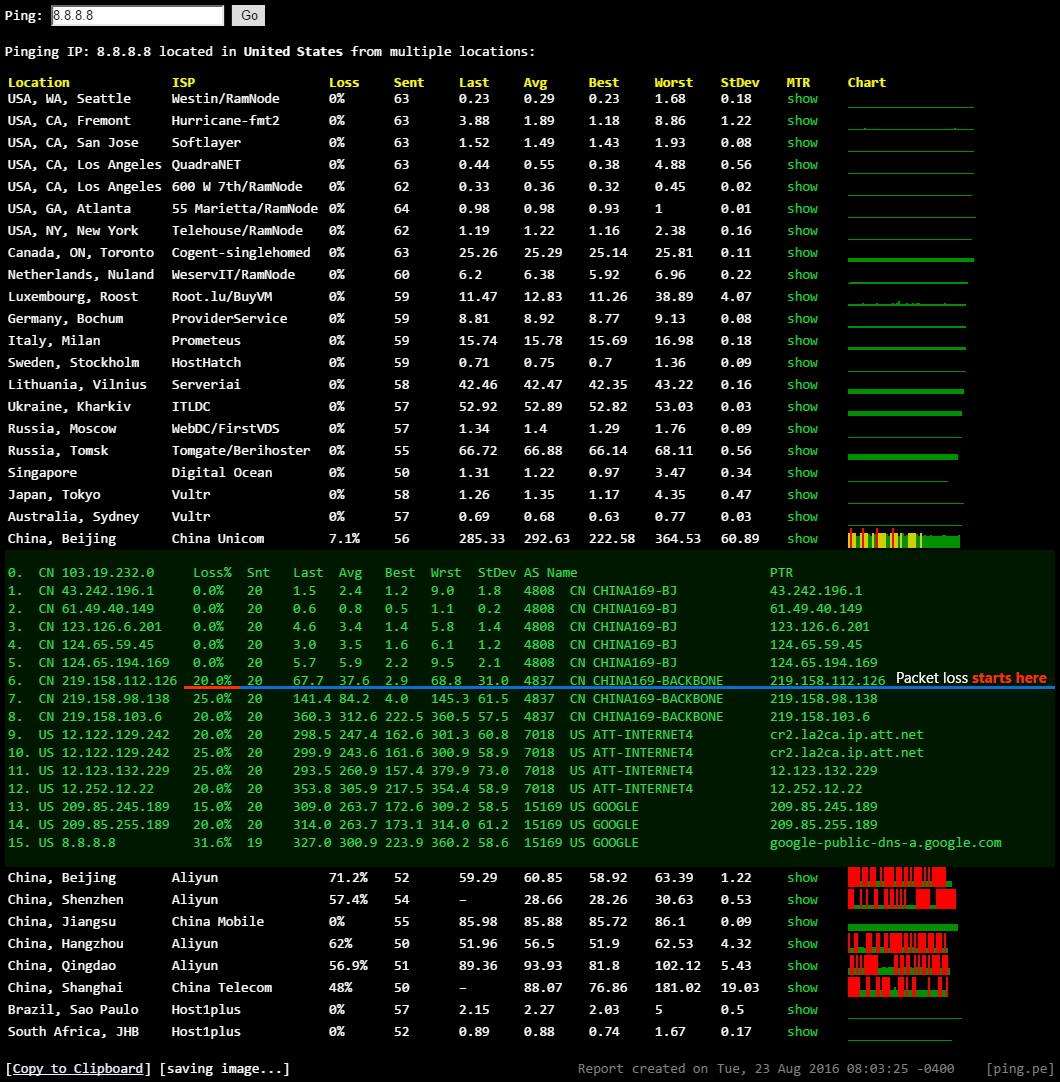
From this report it is clear that the issue is within China. If in doubt, we recommend performing mtr on the return path (in opposite direction – from the affected IP back to your home IP). Due to path asymmetry you may find a bit different output which may clarify the issue.
Resolving connectivity issues: iptables
In many cases connectivity issues may arise from incorrect iptables configuration. Very often misconfigured iptables is the result of a recent change of the IP address of the VPS due to migration performed via KiwiVM control panel. In cases like these you become completely locked out of your VPS, and ping.pe output looks like this:
Notice that VPS is completely unreachable. If you open up the MTR report, you will see the following:
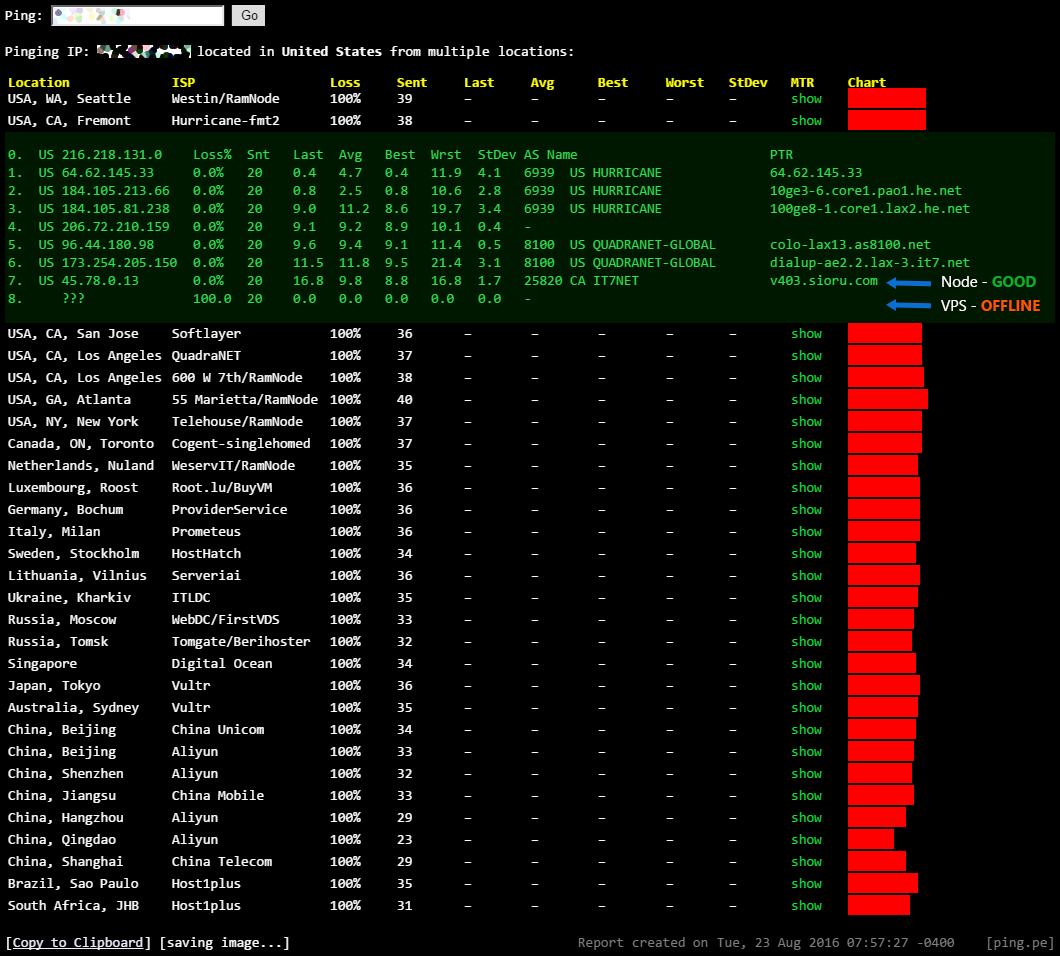
As you can see from the above example, the physical node “v403.sioru.com” is functioning fine, however the specific VPS we are pinging is offline.
The quickest way to verify that iptables is indeed the issue is to use Interactive console in KiwiVM to stop iptables service (please search online on how to stop iptables, the exact command depends on your distribution). If network connectivity is restored, then we know that iptables is the issue.
To check your iptables rules, issue the following command:
iptables -L -n; iptables -L -n -t nat
Note that in order for this command to work properly, your iptables service must be restarted again.
If you see old VPS IP in the output, especially in the NAT table, then you will have to manually modify the rule (again, search online on how to delete and add iptables rules).
Alternatively, you can wipe all iptables rules with the following commands:
iptables -F; iptables -t nat -F; iptables-save > /etc/sysconfig/iptables
As the last resort, you could always reload your VPS by installing a fresh operating system, this will completely restore all network connectivity.
How to Mount ISO using KiwiVM and install Turn-key Linux
NOTE: We post this article sent to us without any edits.
Quick. Simple. Ready-to-use. Fantastic!
Let’s try to install WordPress from the Turnkey-wordpress ISO image:
1. Select WordPress from the drop-down menu. Click [Mount].
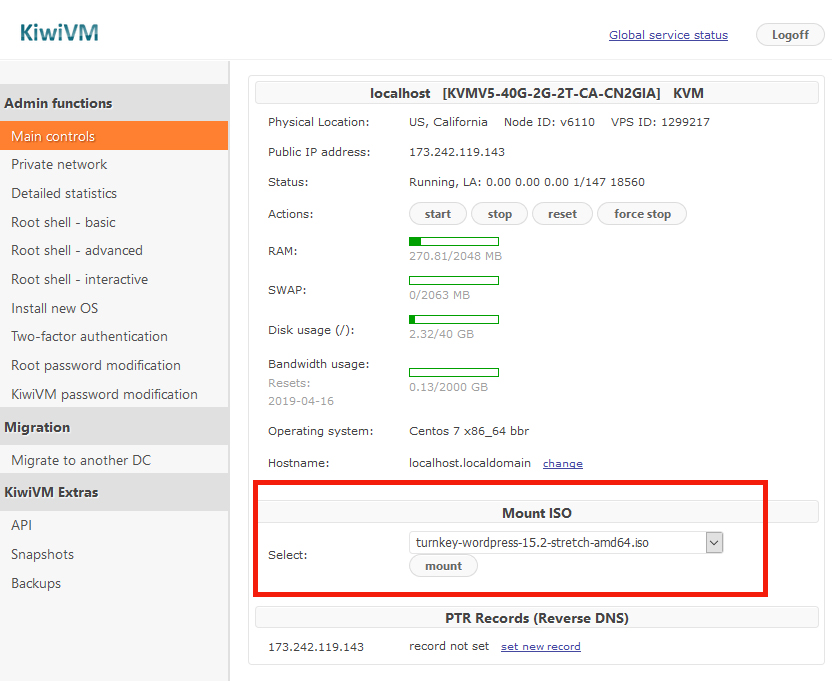
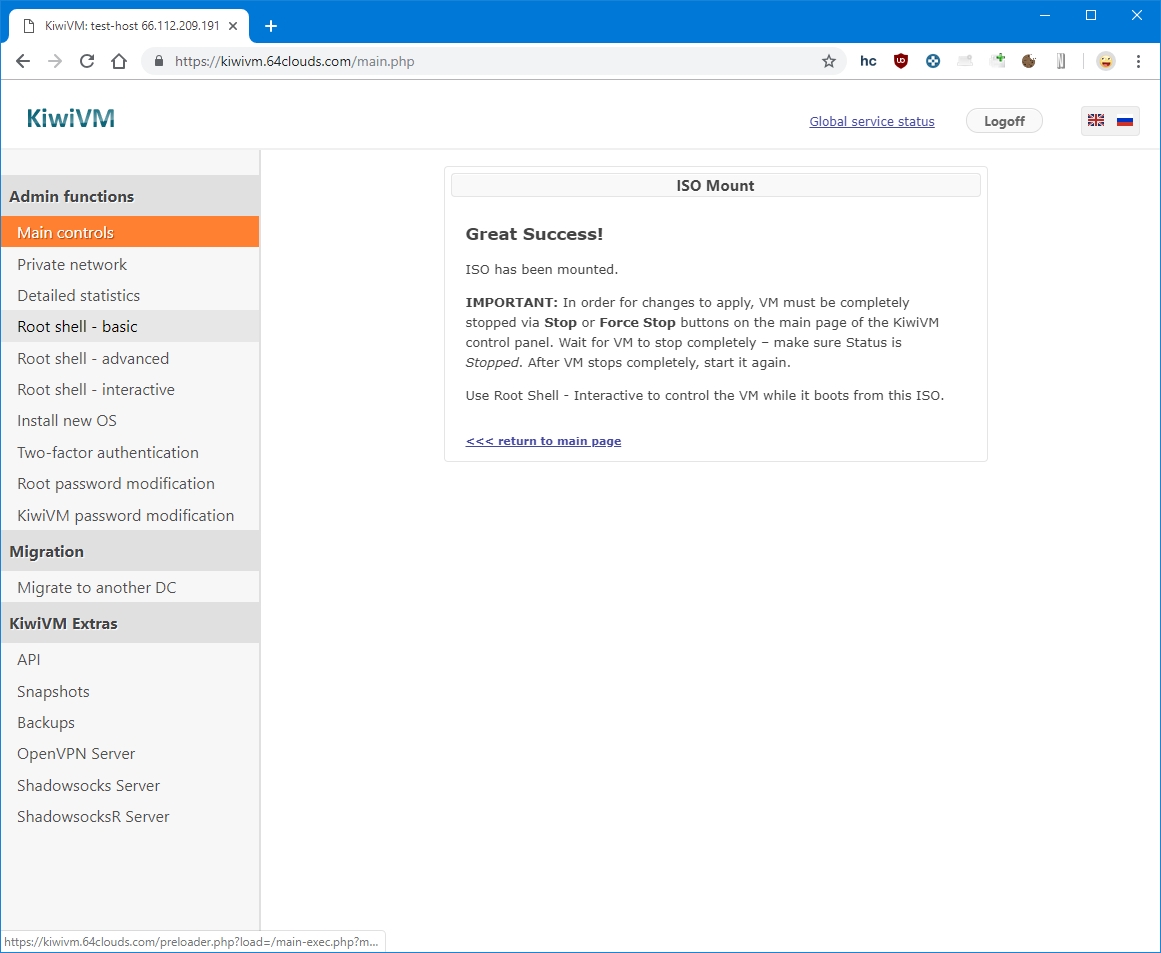
a) Receive message: “IMPORTANT: In order for changes to apply, VM must be completely stopped…”
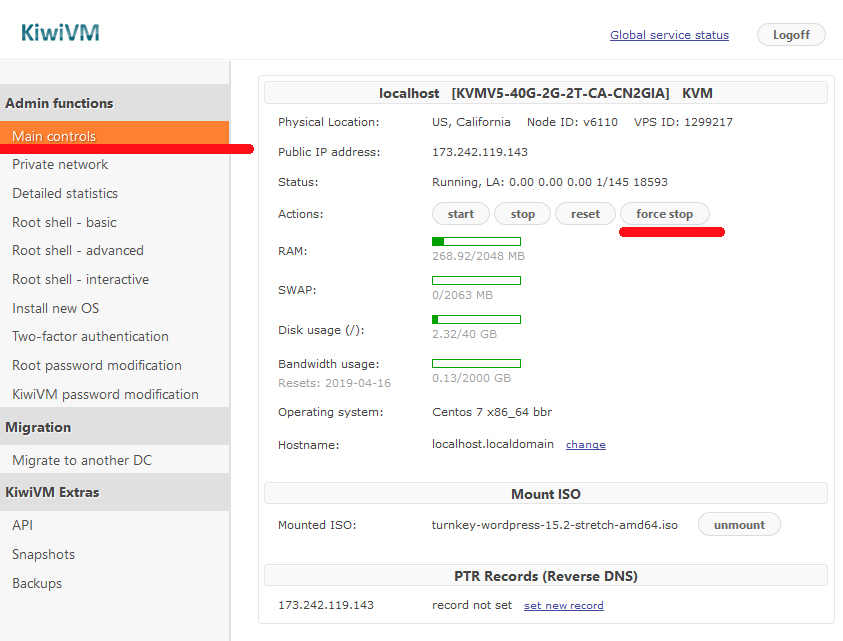
b) Go to KiwiVM Main controls and stop VPS by pressing button [Force Stop].
(While button [Stop] will also work, it might take longer to stop VPS).
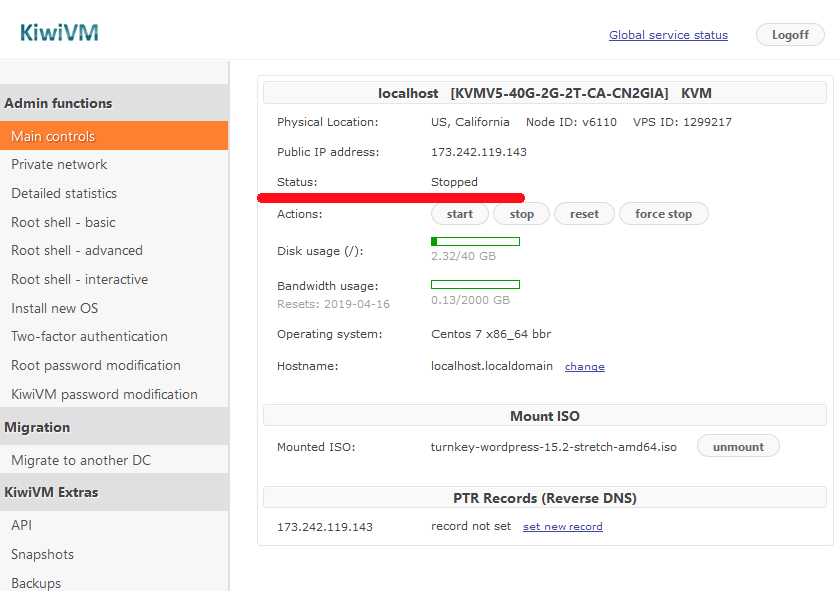
c) Check your VPS status by returning back to Main controls, it should display:
Status: Stopped
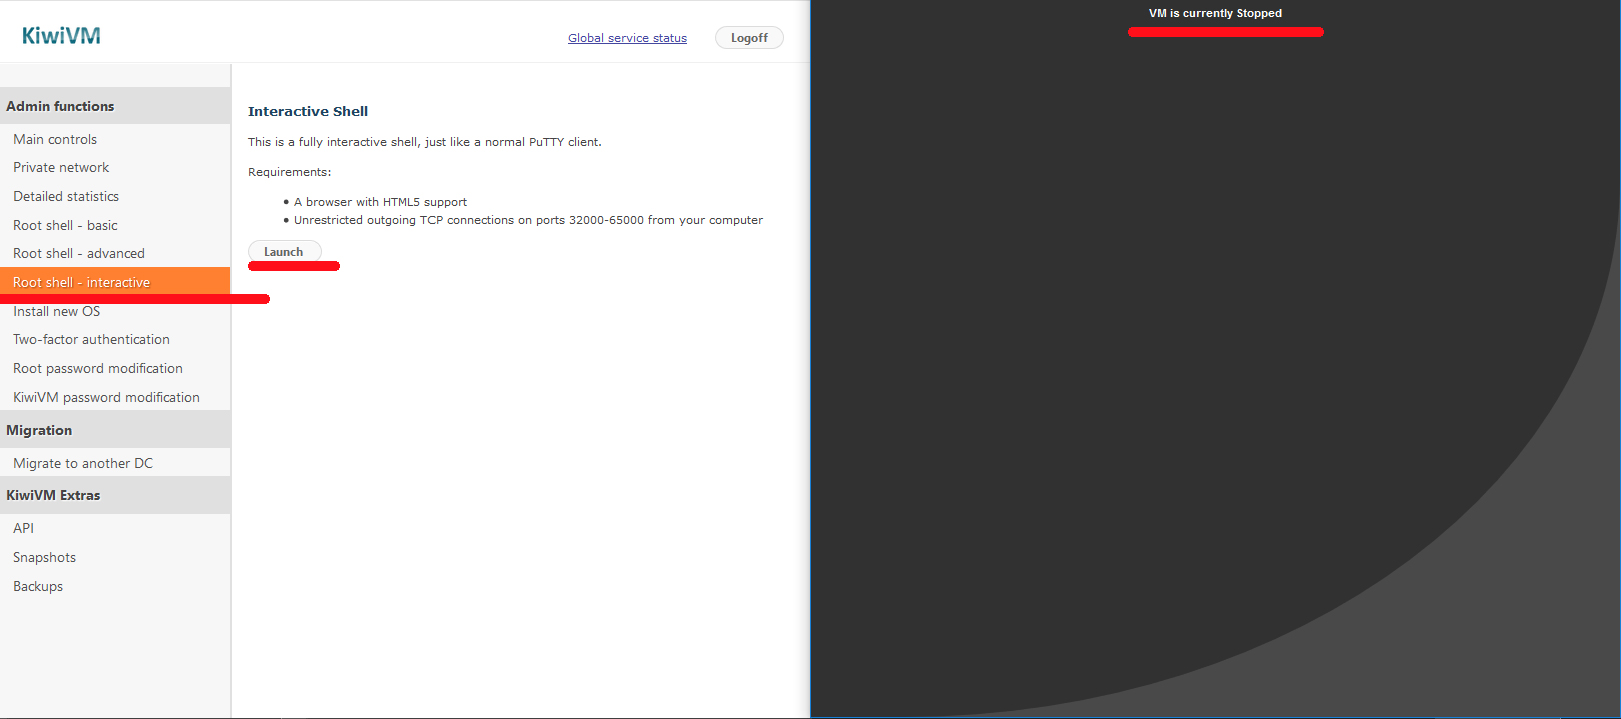
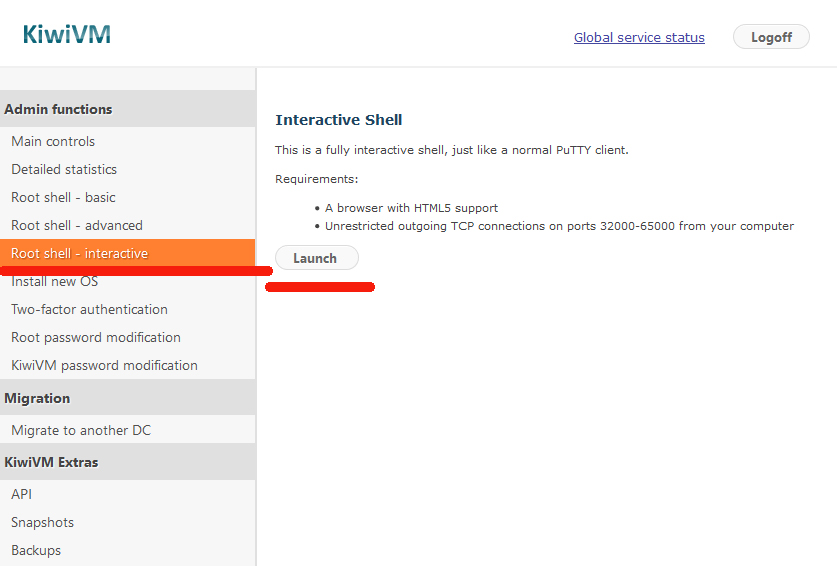
2. In the KiwiVM choose menu link “Root Shell interactive”. Press button [Launch].
Receive message “VM is currently stopped”
This is OK. Our VPS is indeed stopped. Keep this window open.
3. Back to KiwiVM Main controls and start VPS by pressing button [Start].
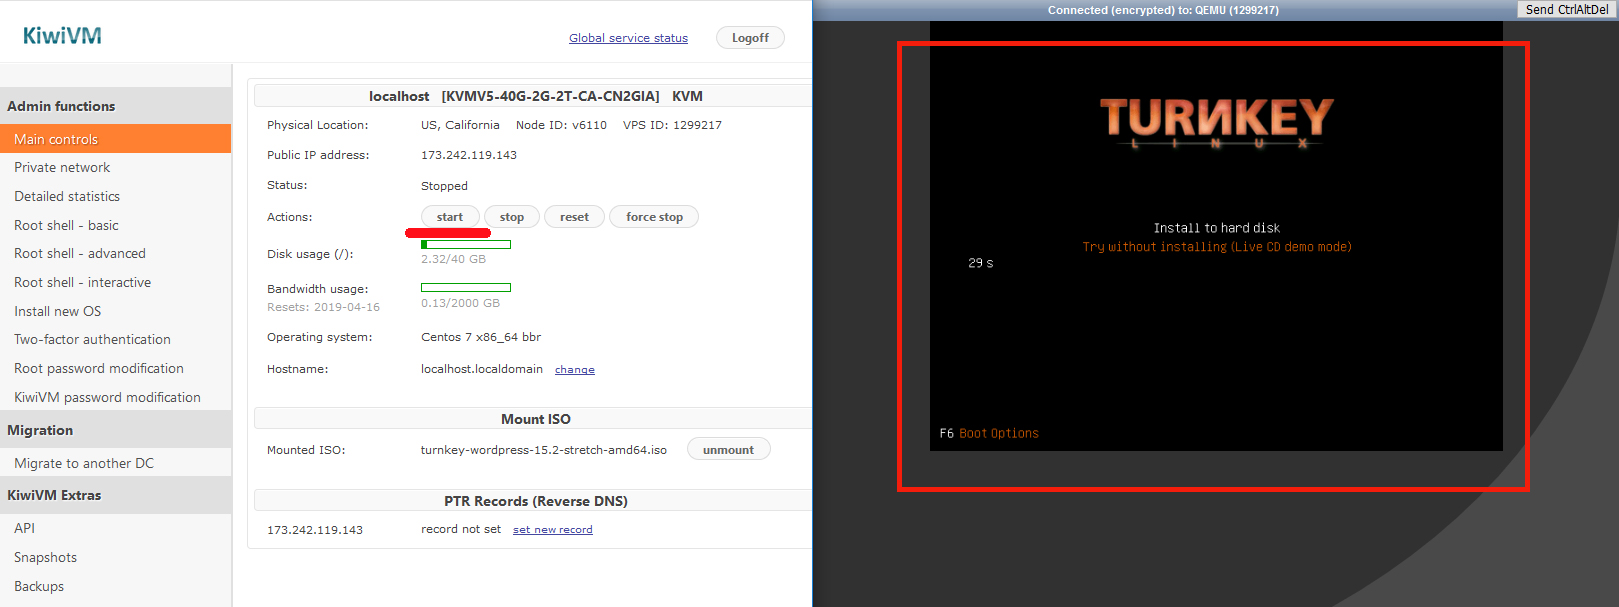
4. Now Root Shell Interactive is “awaken”. Just wait for the countdown and see it loading.
5. The actual Worpress mounting begins:
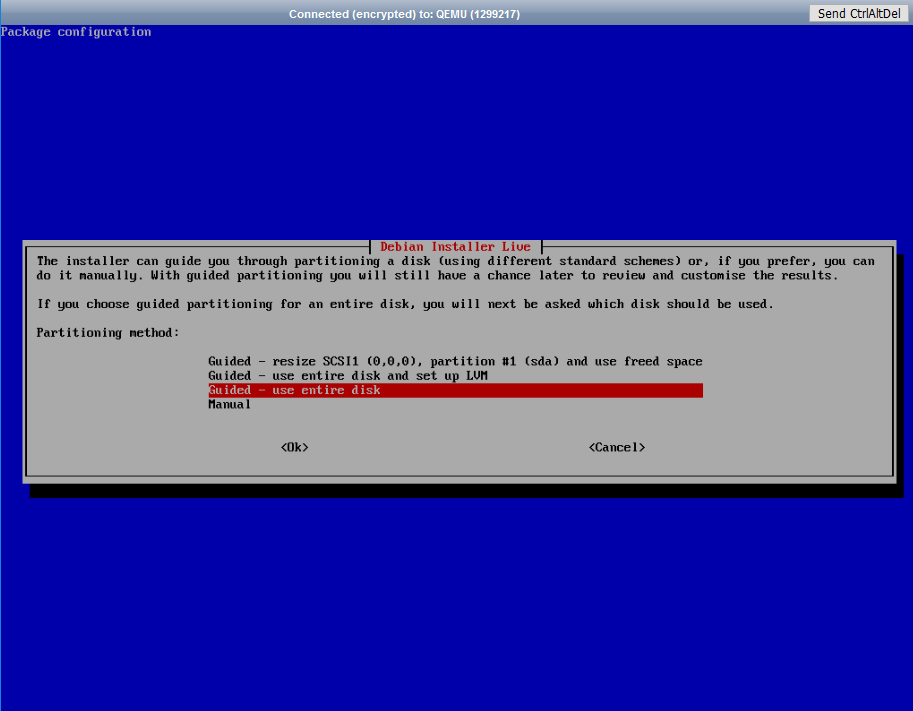
a) Prompted to select partitioning method:
Select “Guided – use entire disk”. Press [Enter].
b) Prompted: “Write the changes to disk?”
Select “Yes”. Press [Enter].
c) Prompted : “Install GRUB boot loader to the master boot record?”
Select “Yes”. Press [Enter].
d) Prompted: “Would you like to restart now?”
NOTE: If this is your first installation, before you select “Yes” and Press [Enter], please read step 6 right now, as you’ll need to act faster on that step.
6. Watch closely as after restarting and loading it goes back to the initial Turnkey welcome window and starts countdown (30 sec) to RESTART the whole installation process all over again …Evil laugh…
So the next very quick step is to press [Space] key on your keyboard to stop the countdown. (Alternatively, you can go back to the KiwiVM Main controls and press button [Force Stop] to stop your VPS).
7. Unmount the ISO by pressing button [Unmount].
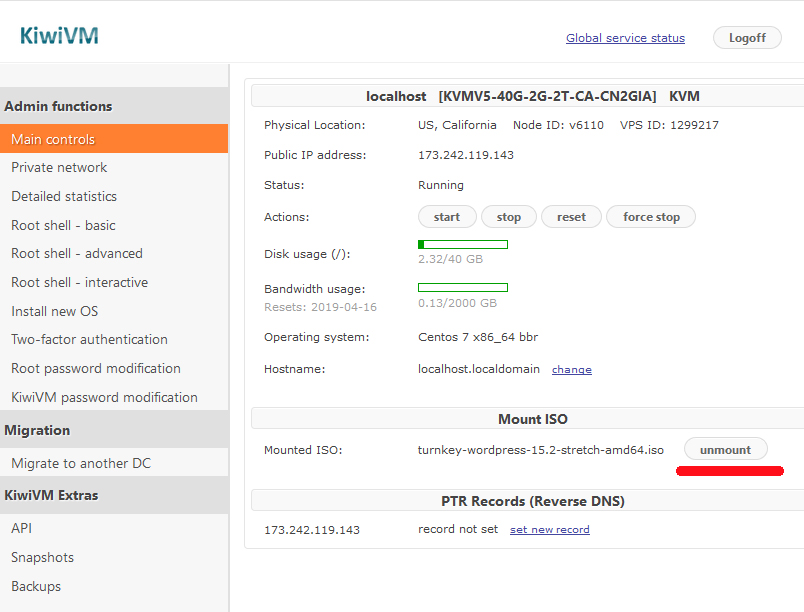
a) Receive message: “In order for changes to apply, VM must be completely stopped”
b) Go to KiwiVM main menu and stop VPS by pressing button [Force Stop]
c) Start your VPS by pressing button [Start].
8. Go back to Root Shell Interactive window.
Wait for the loading to complete until you see the prompt to enter Root password.
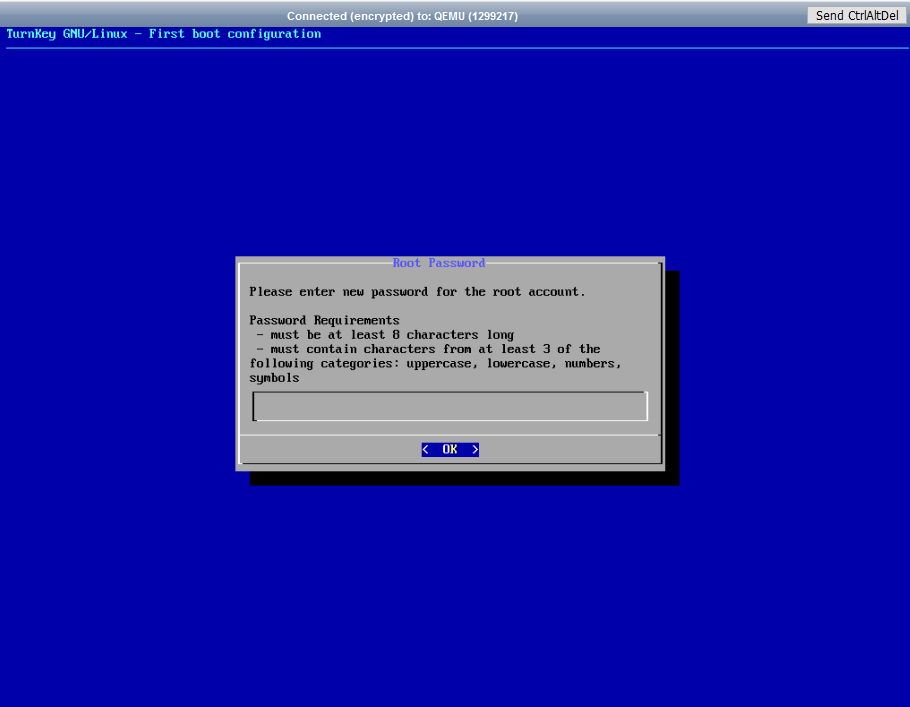
a) Enter all passwords asked (Root password, MySQL password, WordPress admin password).
b) Enter all emails asked.
c) Prompt “API Key”. Select “Skip” (use Tab button or Down button on your keyboard to hop to the “Skip” option)
d) Email: enter your email and press “Enable”
e) Correct email? “Yes”
f) Security updates “Install”
g) Reboot now? “Reboot”
9. After reboot, you get a Final screen, where you don’t need to press anything anymore.
(In our example with WordPress it reads: “WORDPRESS appliance services”, “Adbanced menu”).
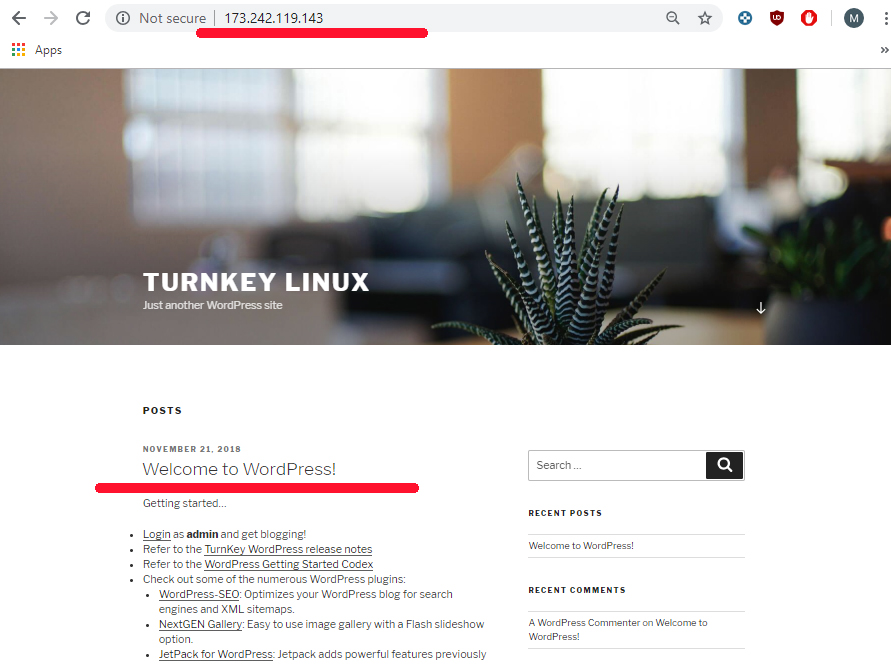
No need to press anything. Instead, go to see your new Web:
In your browser type in the IP address as shown on the screen (you’ll have your own IP shown there):
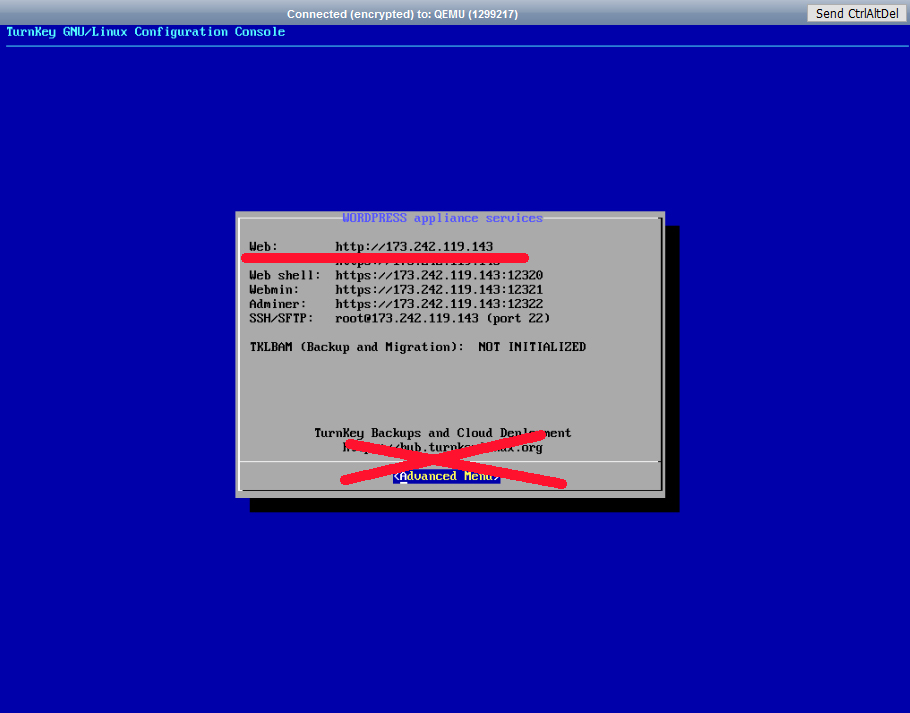
IT WORKS!
Now, to add your domain, follow this article:
How to host a website on Linux VPS (Centos 7 OS)
How to rescue a damaged filesystem with Ubuntu 18 Live DVD
VPS fails to boot, what to do?
You have a number of options:
- Option 1: Boot your VPS in rescue mode, if your OS allows this
- Option 2: Boot your VPS from a Live DVD, then mount your VPS filesystem to perform recovery or save valuable data
- Option 3: Create and download a full snapshot of the VM to your local PC, then use any virtualization environment to extract files
We will focus on Option 2 in this example and will boot our VPS from Ubuntu 18.04 ISO to get access to our disk partitions. This will work regardless of what OS you are using (CentOS, Fedora, Ubuntu, Debian etc.) as Ubuntu 18 can work with all these OS filesystems.
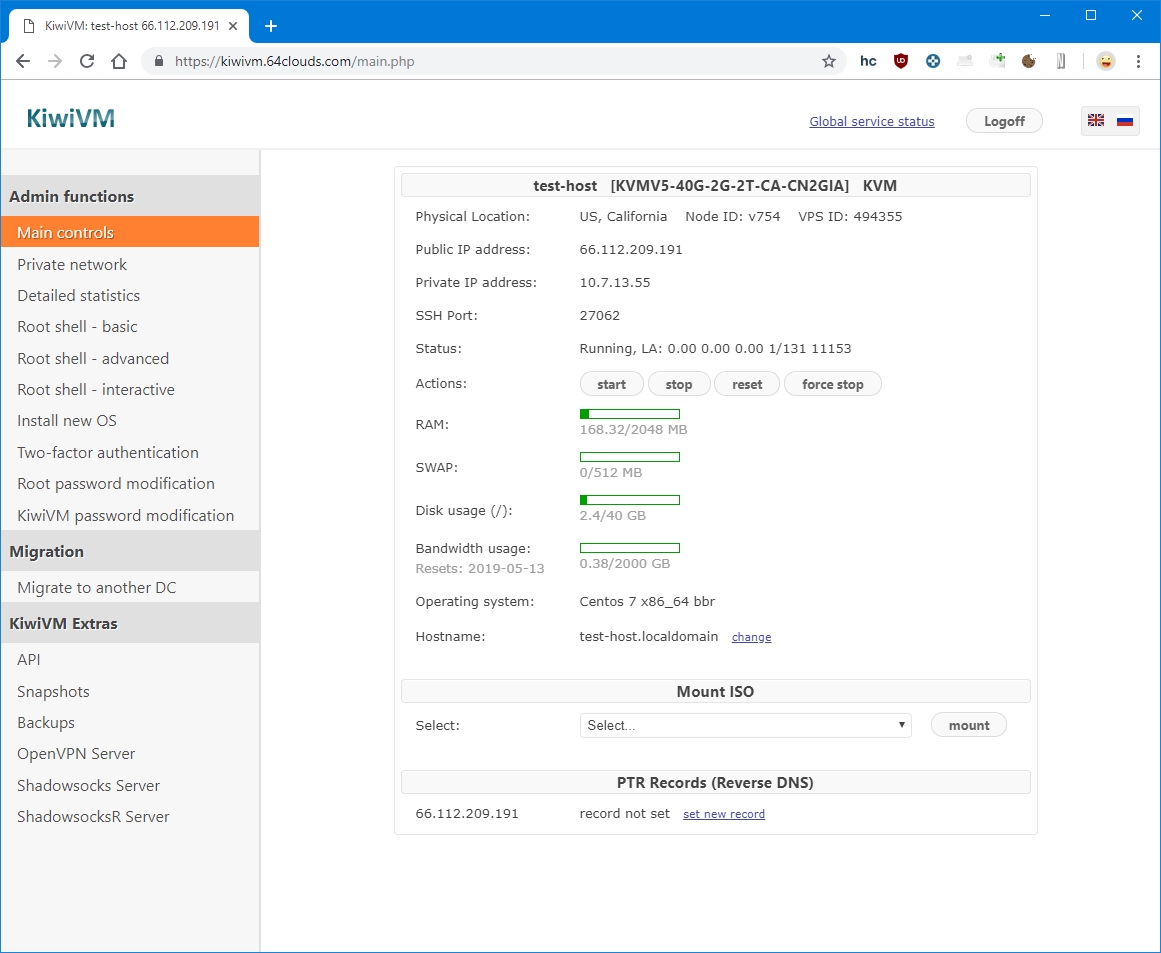
Step 1. Login to KiwiVM
You should see the following screen:
Step 2. Select ubuntu-18.04 desktop ISO
Server version of Ubuntu 18.04 does not offer Live mode, so we choose Desktop ISO:
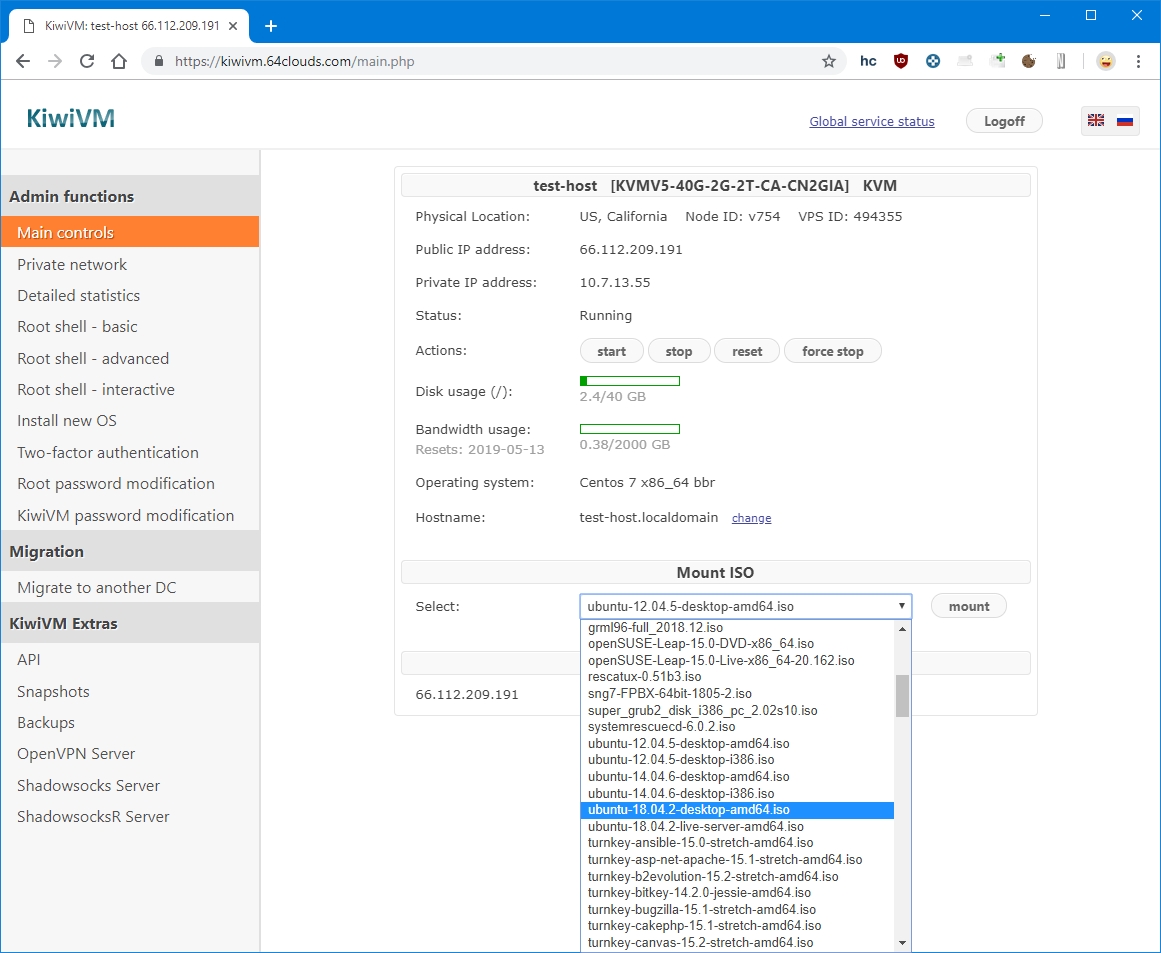
Then click ‘mount’ button:
Step 3. Boot VPS from ISO
At this point we need to completely stop the VPS and start it again in order for it to successfully boot form ISO image.
First, click ‘force stop’:

We see confirmation screen:

Back on main page, confirm the status is Stopped:

Now, click ‘start’

At this moment a new window will open (Interactive shell) and after about a minute the following screen will display:
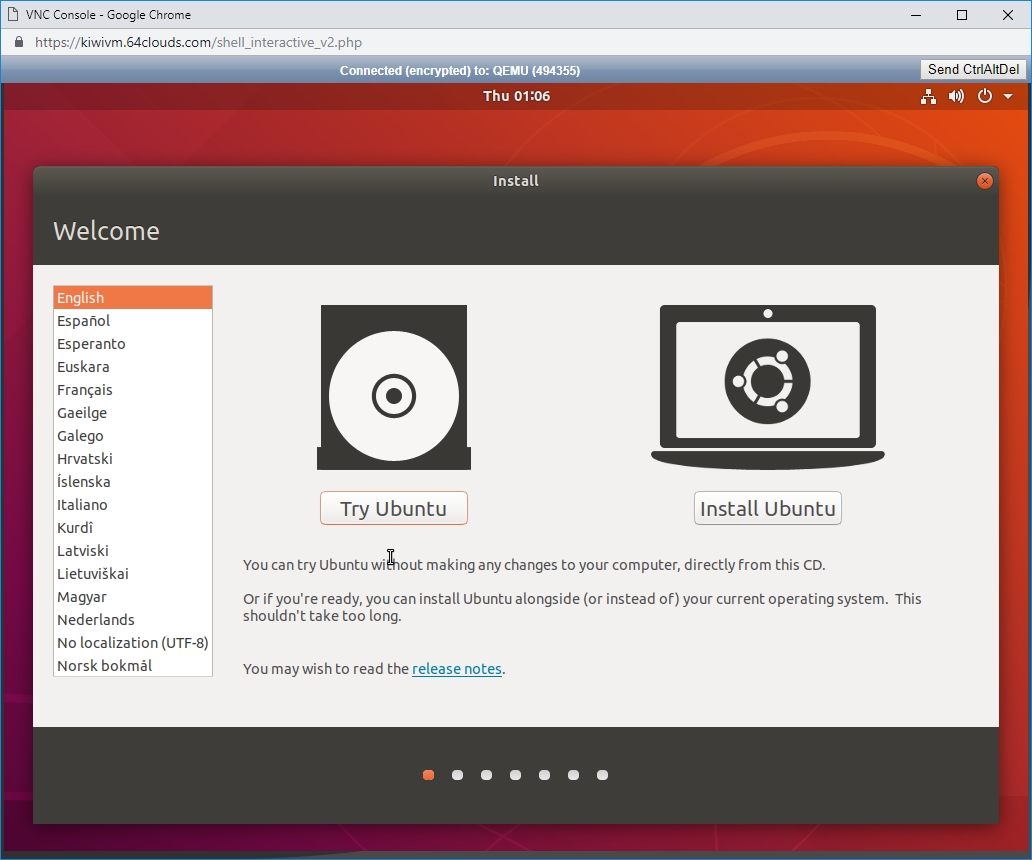
Click ‘Try Ubuntu’
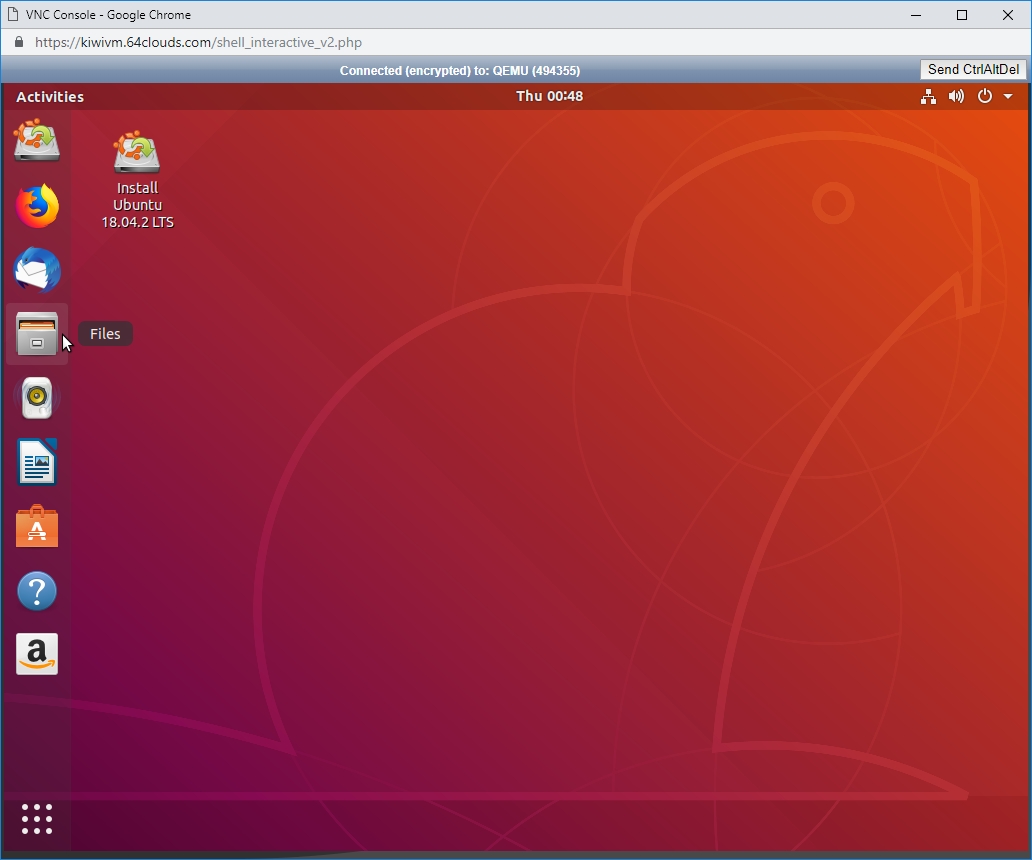
After a few more seconds we will get to the Ubuntu desktop:
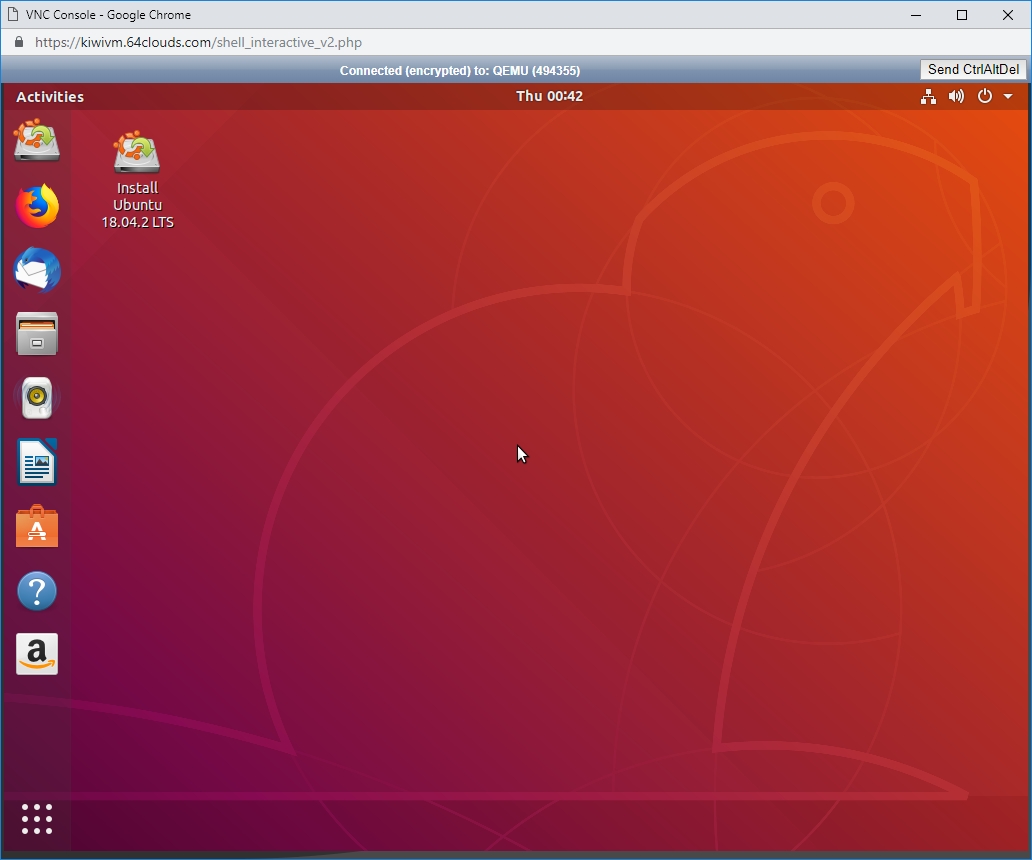
Step 4. Open Terminal
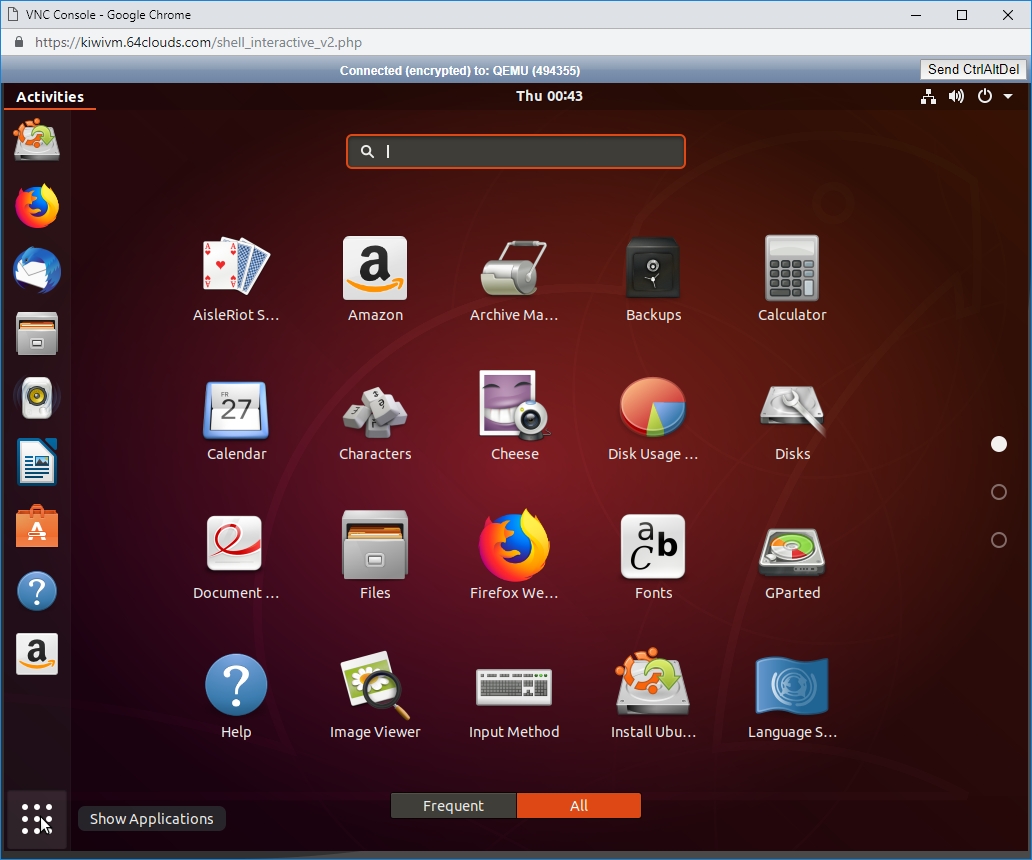
In the bottom left corner, click ‘Show Applications’ button (the one with nine dots):
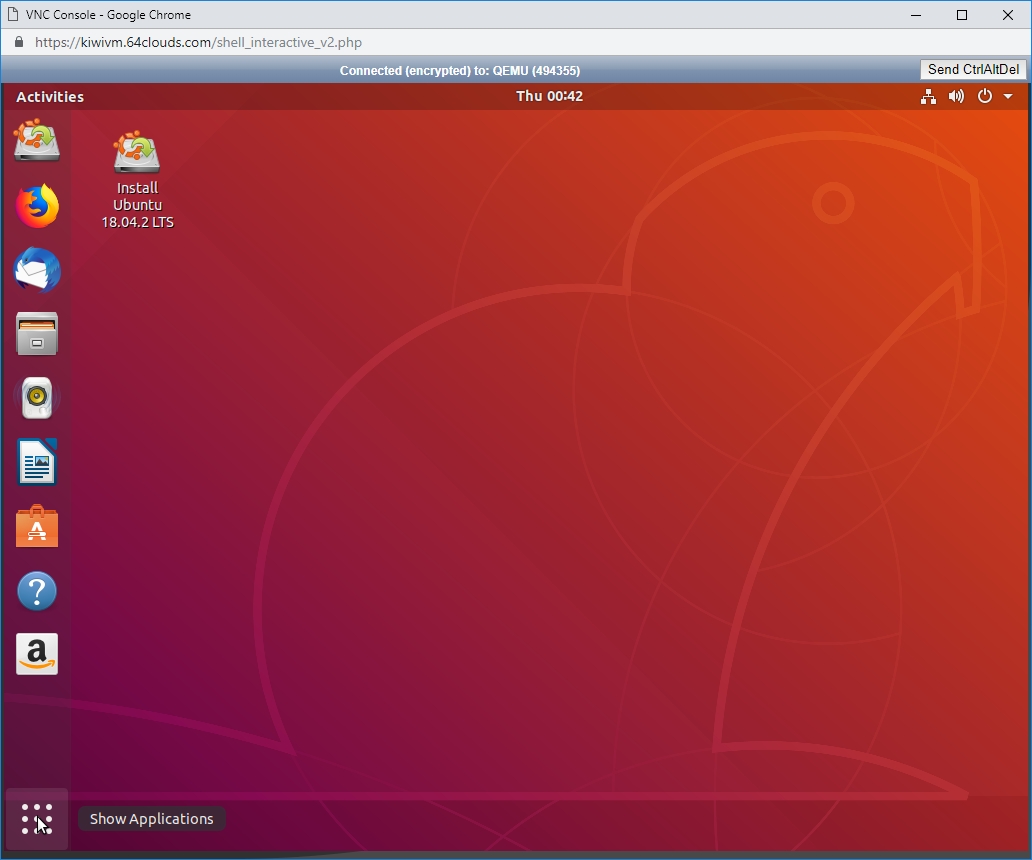
You will see all applications:
Type ‘Terminal’:
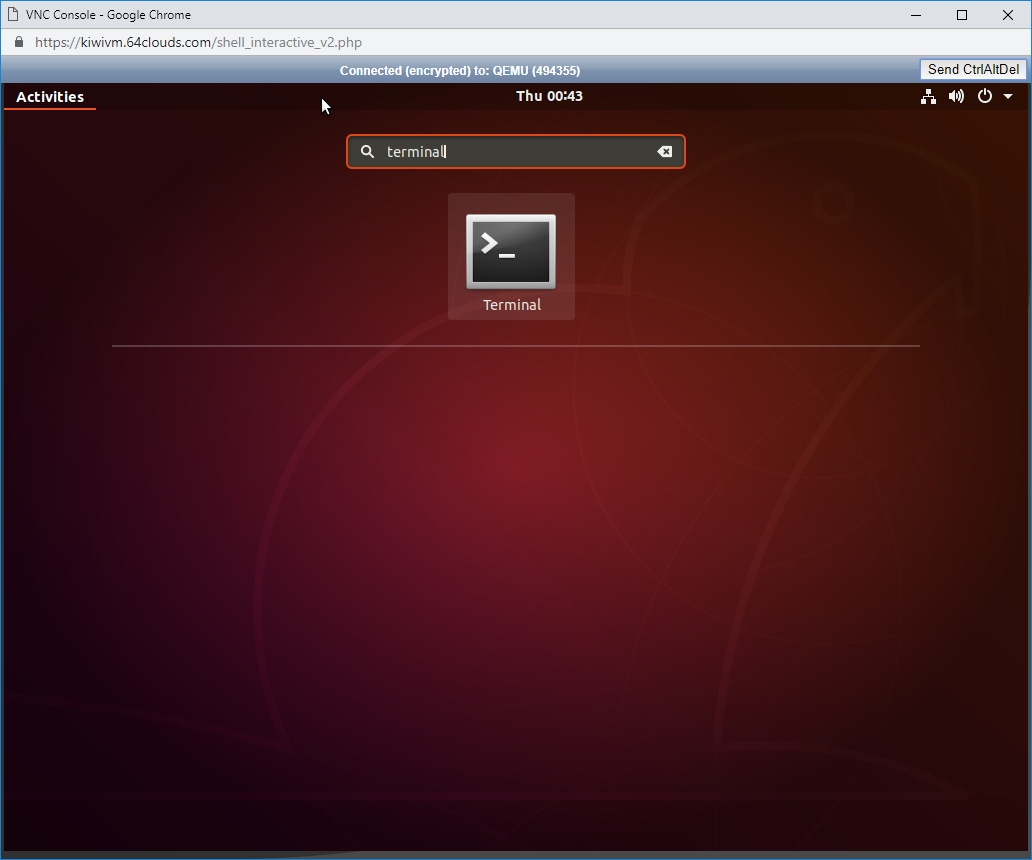
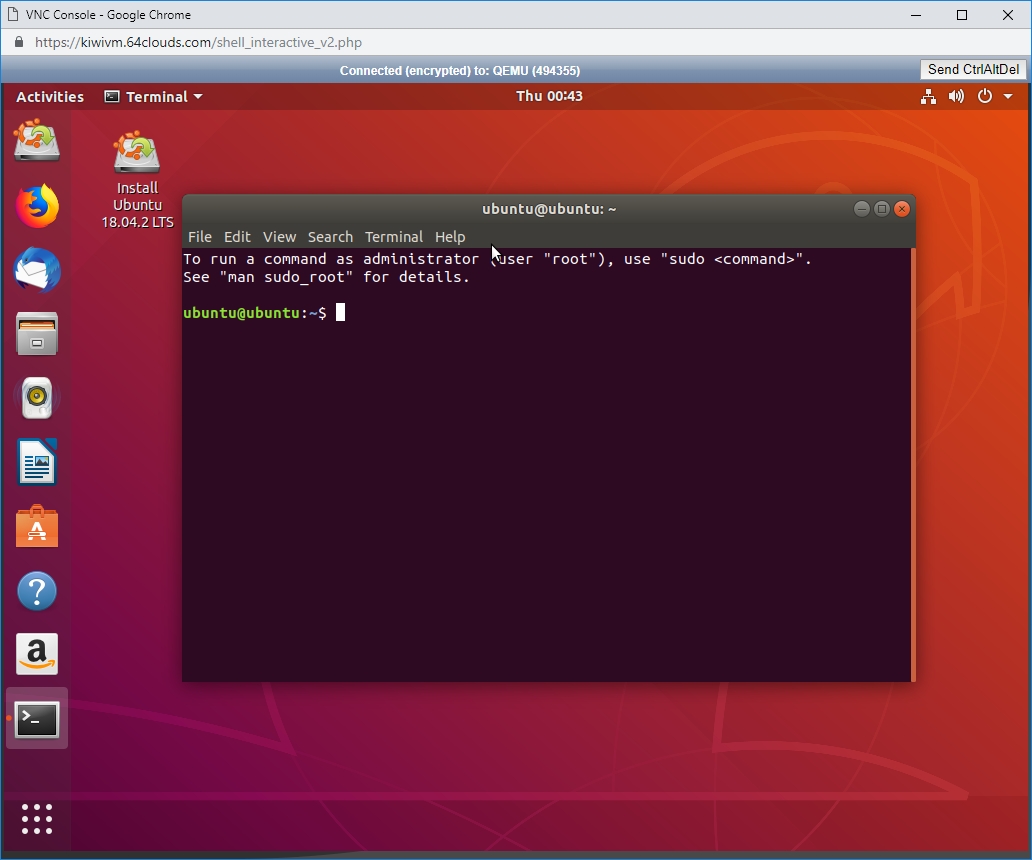
Click ‘Terminal’ icon, and the terminal will open:
Step 5. Mount VPS partitions
Type the following commands:
sudo mkdir /mnt/boot
sudo mkdir /mnt/data
sudo mount /dev/sda1 /mnt/boot
sudo mount /dev/sda2 /mnt/data

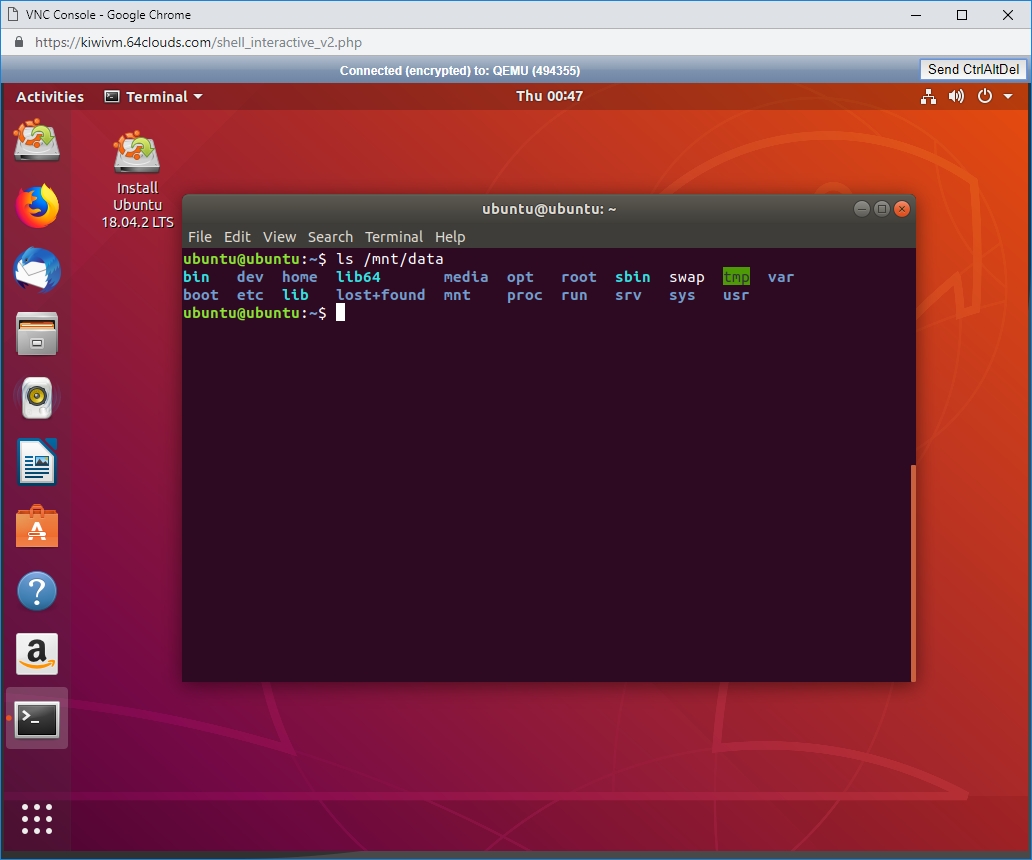
At this point your VPS boot and root partitions are successfully mounted and fully accessible. We can confirm this by listing them:
ls /mnt/boot

ls /mnt/data
Step 6. Copy data or perform recovery tasks
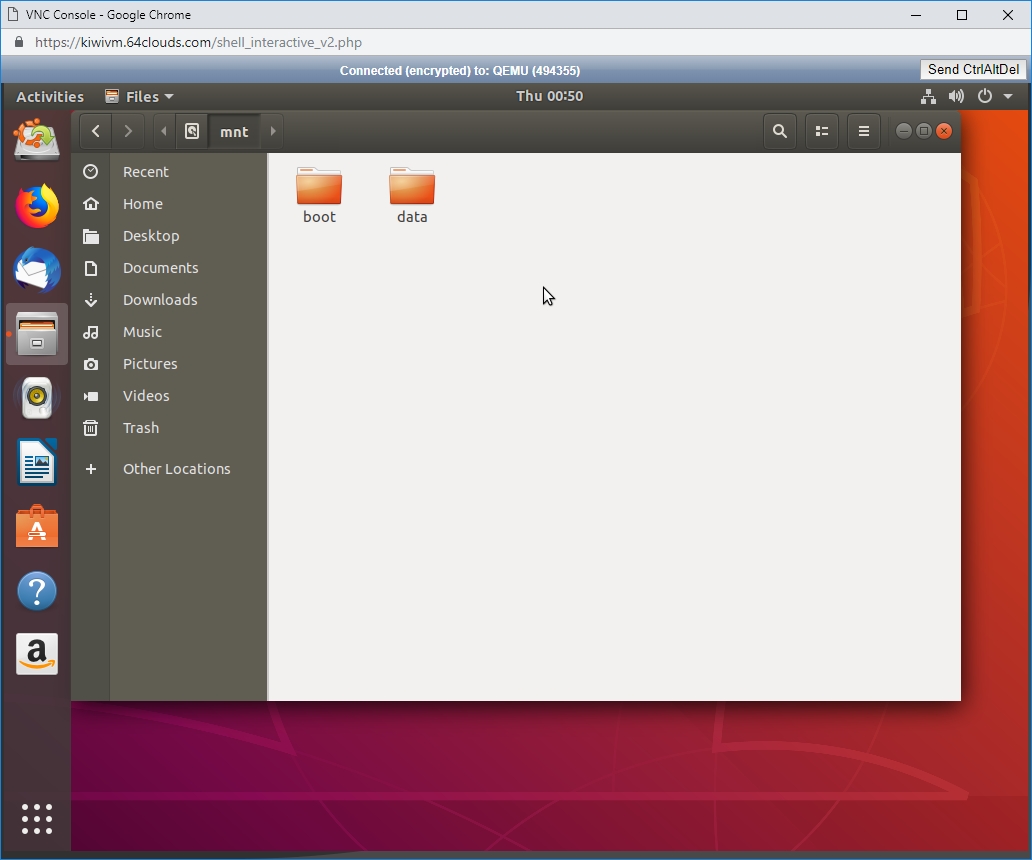
At this point you can perform manual filesystem repair tasks and try rebooting the VPS. If this fails, your next option is to copy all critical data to a temporary remote location. To access your files, either use Terminal as described above, or use graphical Files application:
Application main window:
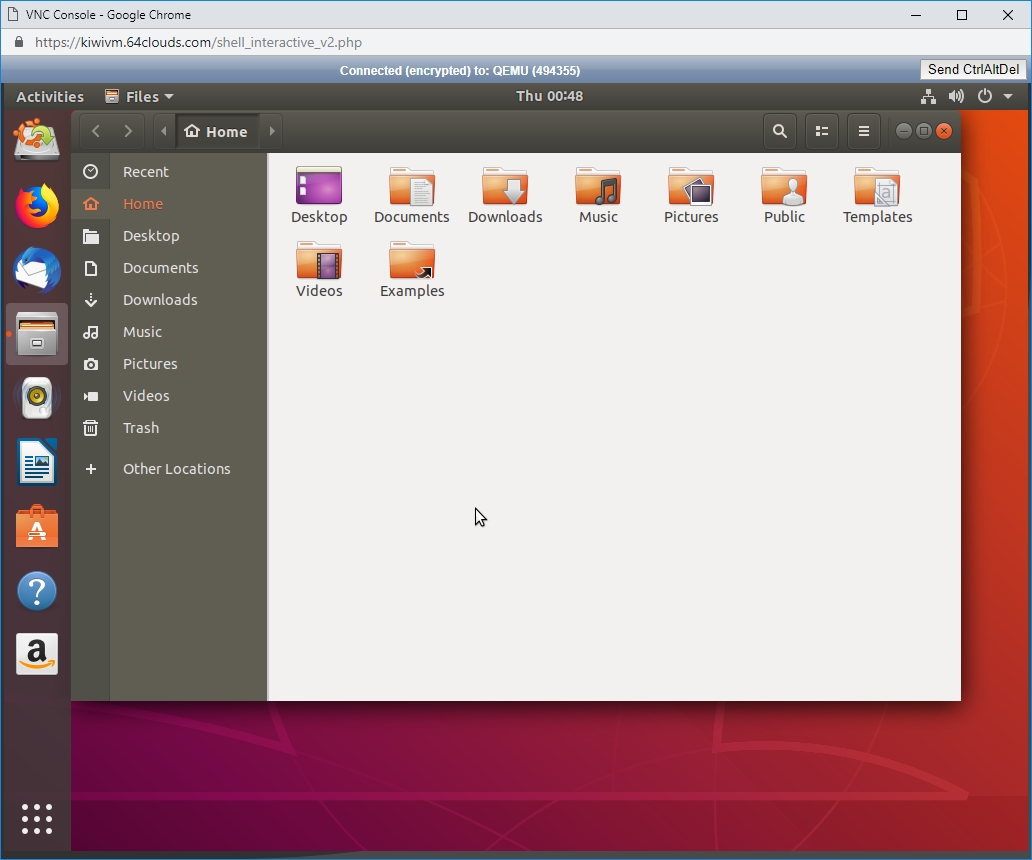
Click ‘Other Locations’:
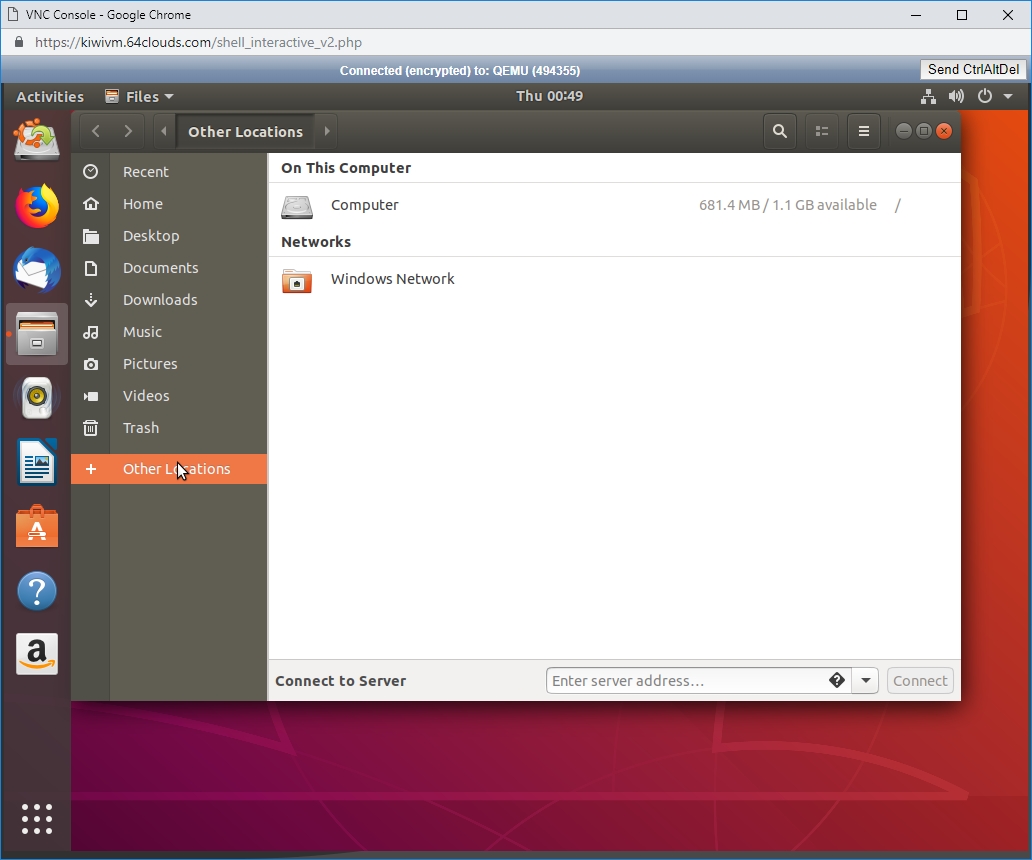
Then click ‘Computer’ and then ‘mnt’:
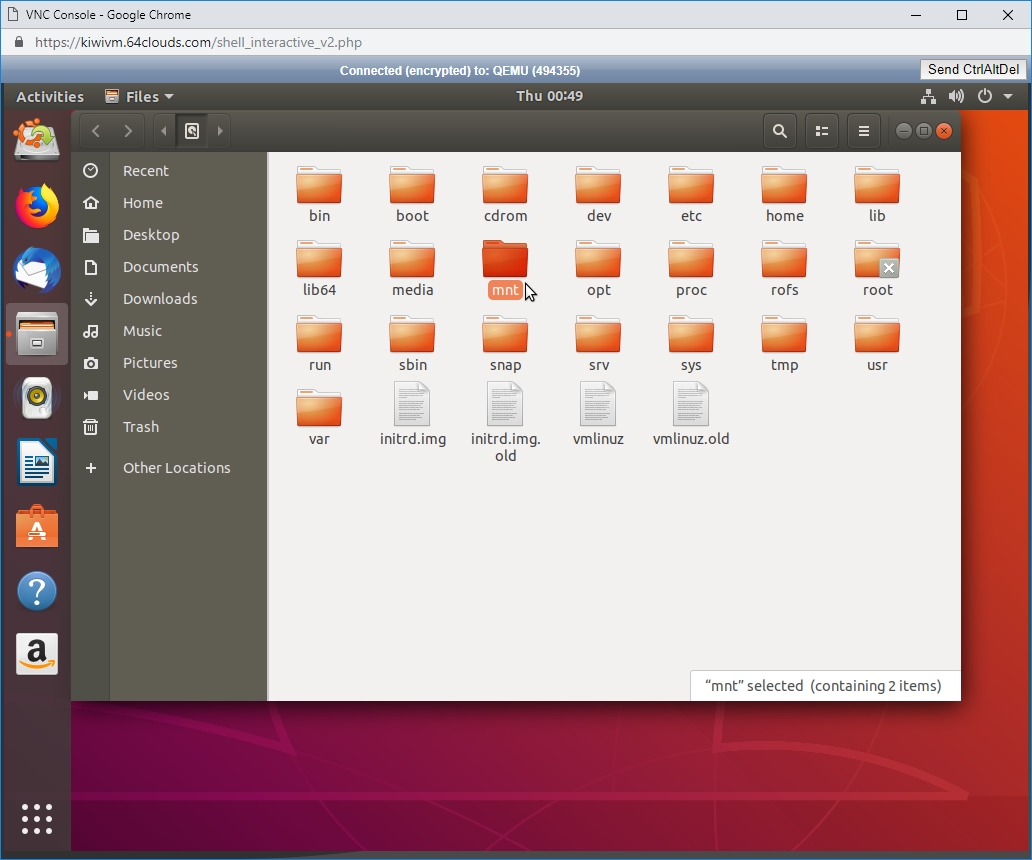
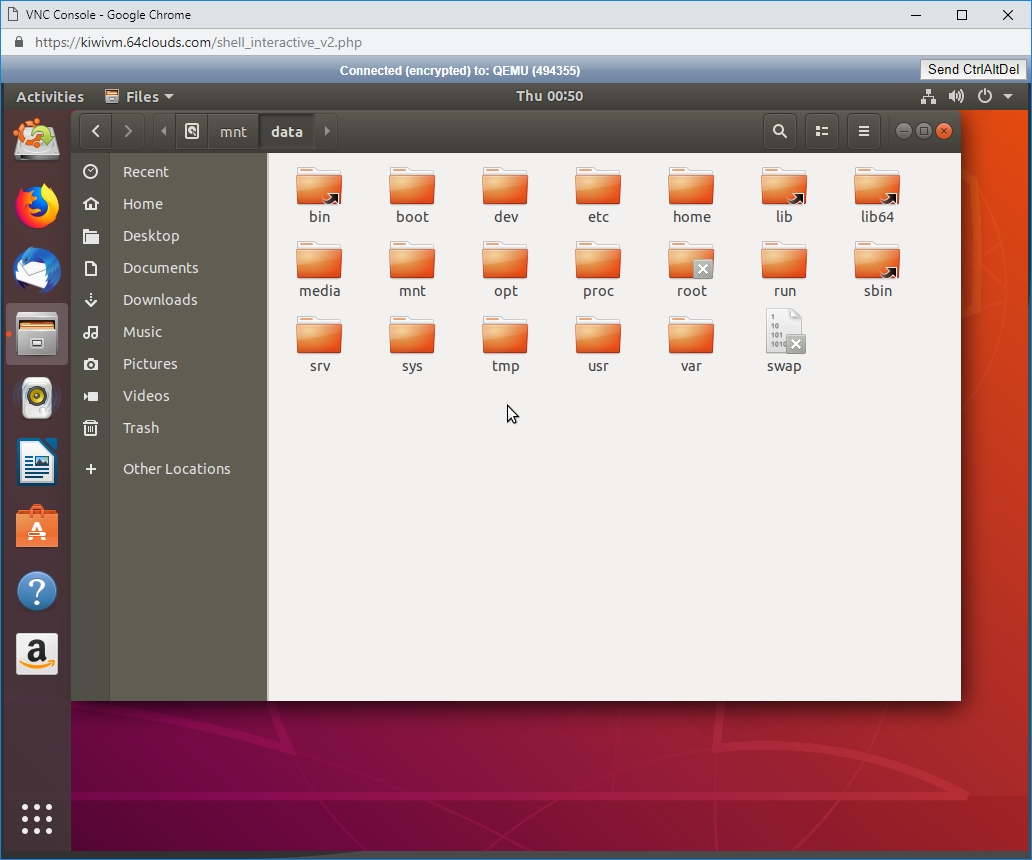
From here, you can access both, boot and data partitions:
Data partition:
Step 7. Unmount ISO and reboot
When finished, unmount ISO by clicking ‘unmount’ in KiwiVM:
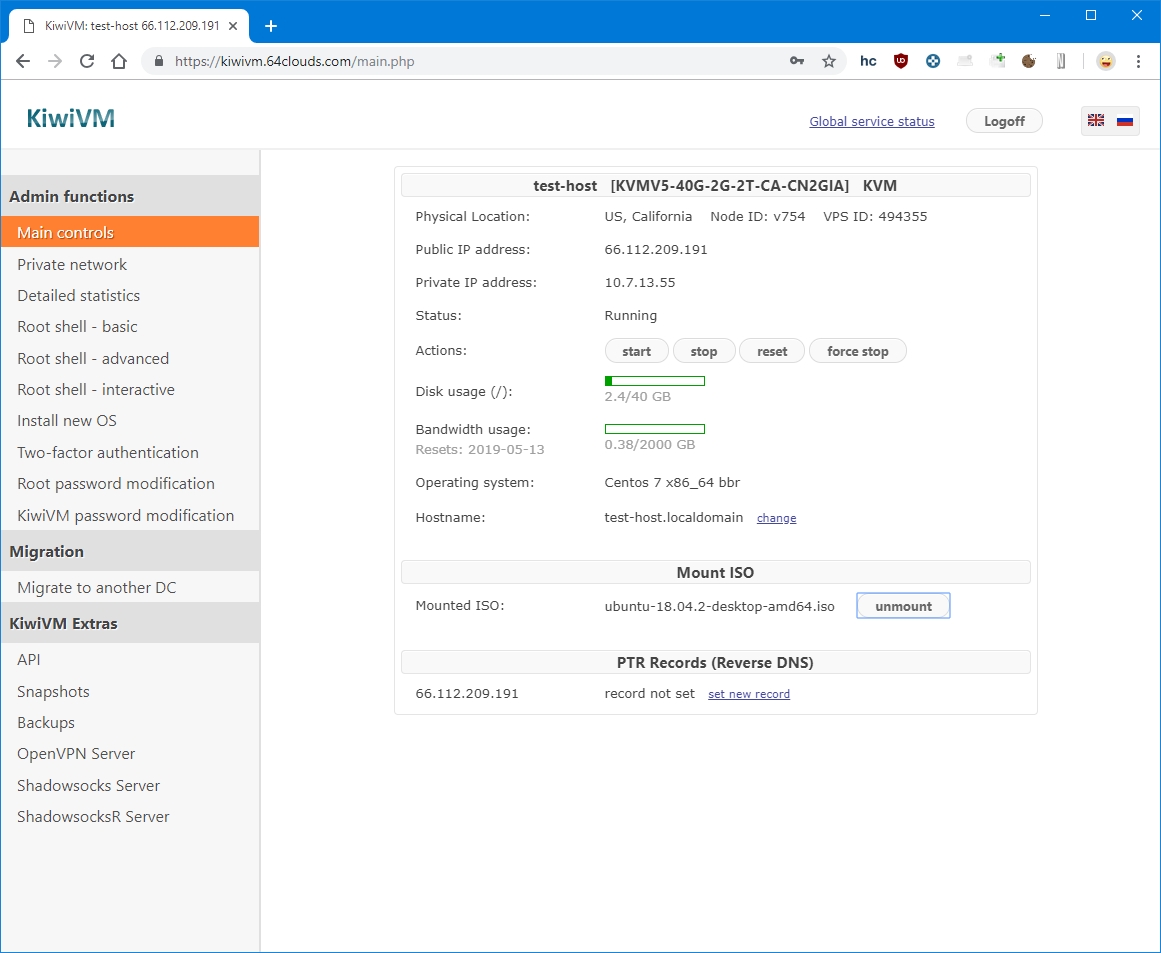
Confirmation screen:

Then, click ‘force stop’

At this point you can start the VPS again and it will boot from its disk as usual.
How to BandwagonHost a website on Linux VPS (Centos 7 OS)
A success story of total beginner, annotated by an experienced Linux administrator
We post this article sent to us without any edits. However one of our Senior Engineers provided their comments where necessary. We feel that this article may be of value to those of our customers who take their very first steps towards building a website on a Linux VPS.
About the author:
What I like about Linux? – The penguin 🙂
What I know about Linux? – Zero
What I need from Linux? – To host my website on Linux VPS
Navigation:
Step 1-7 buying VPS
Step 8-13 setting up VPS
Step 14-16 copying website files etc
(Skip to Step #8 to start “talking” to your VPS via Linux to set up a website).
1. Buying my first VPS
Ordered here: GO
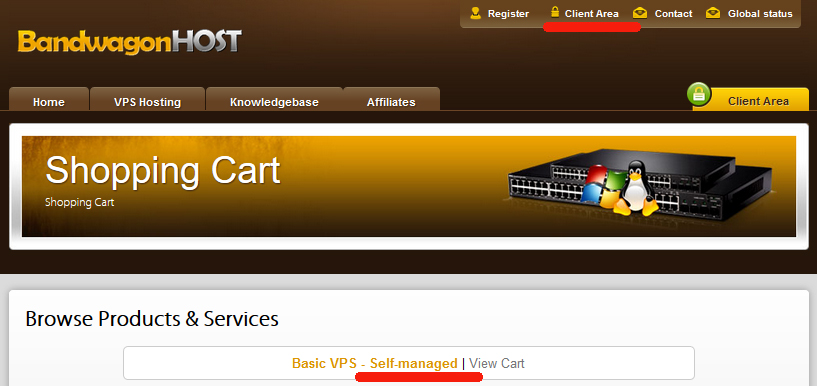
It’s a self-managed VPS. Acknowledged. Let’s do it!
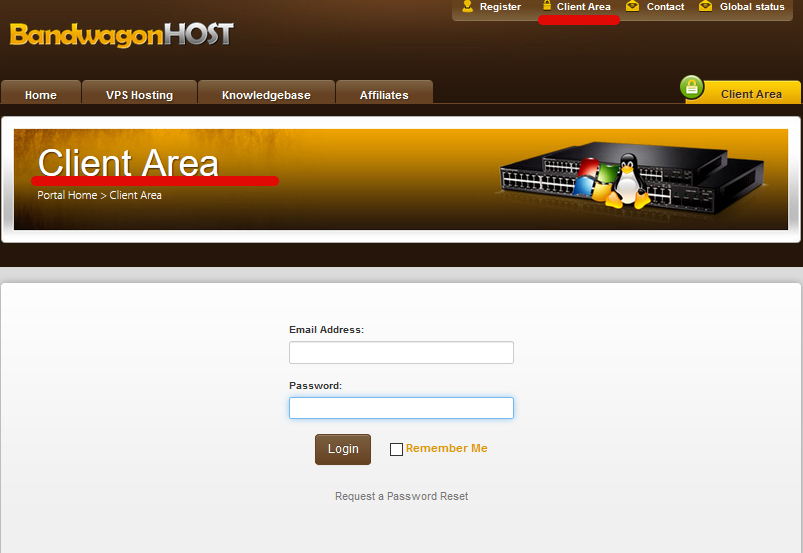
2. Log into my Client Area
If successful, skip to Step #3. If struggling, go to Contact page and ask for help.
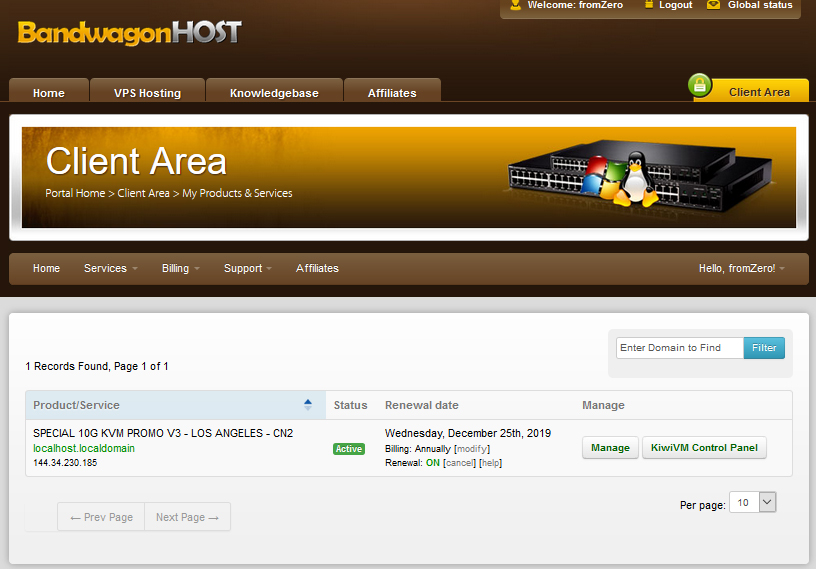
3. Client Area Navigation

Go to tab “Services” -> “My services” It shows the list of all VPS in the account.

Can’t wait to see my new VPS in action… Click “KiwiVM Control Panel” button to go to your VPS Control Panel.
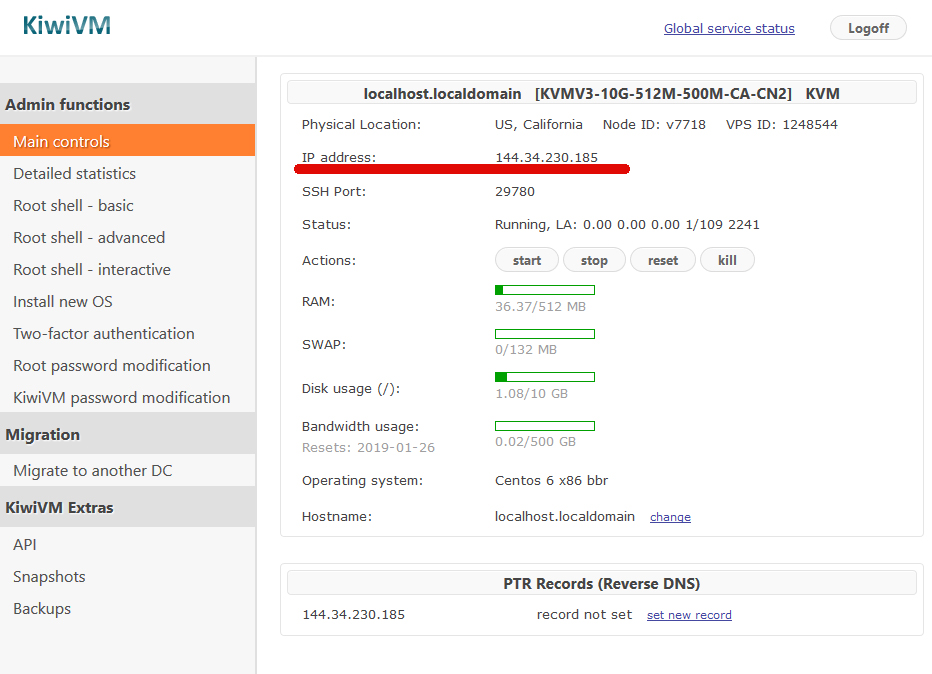
4. KiwiVM Control Panel first look
OK, how to build my website here? Just browsing through menus, very little clue about any of this VPS stuff 🙂
![]()
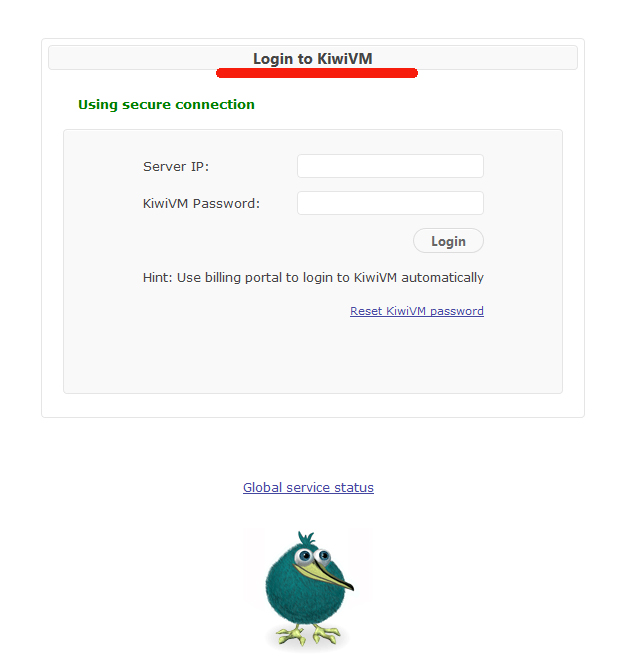
5. KiwiVM Control Panel Log in and Password
Important first step: Change your KiwiVM Control Panel password (before you Log off)
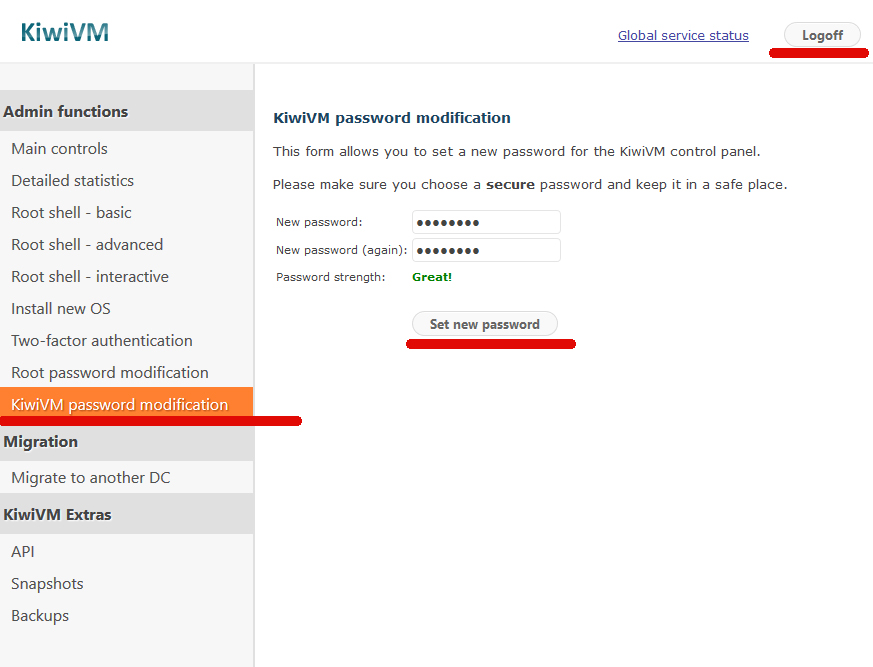
If you just like me logged off mindlessly, you’re now seeing this:
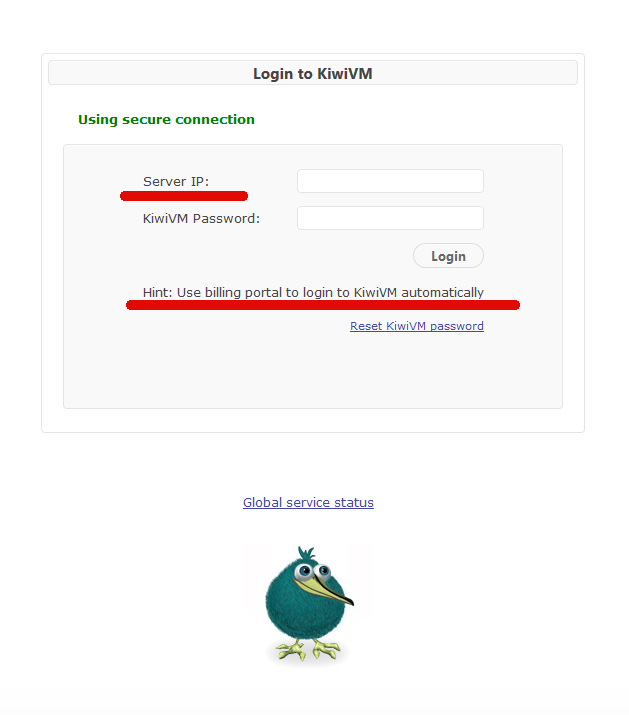
Passwords and more passwords… Anyway, where do I get the Server IP now?
Answer: go back to Client area (Step #2) or quick link: https://bandwagonhost.com/clientarea.php
Here is IP address:
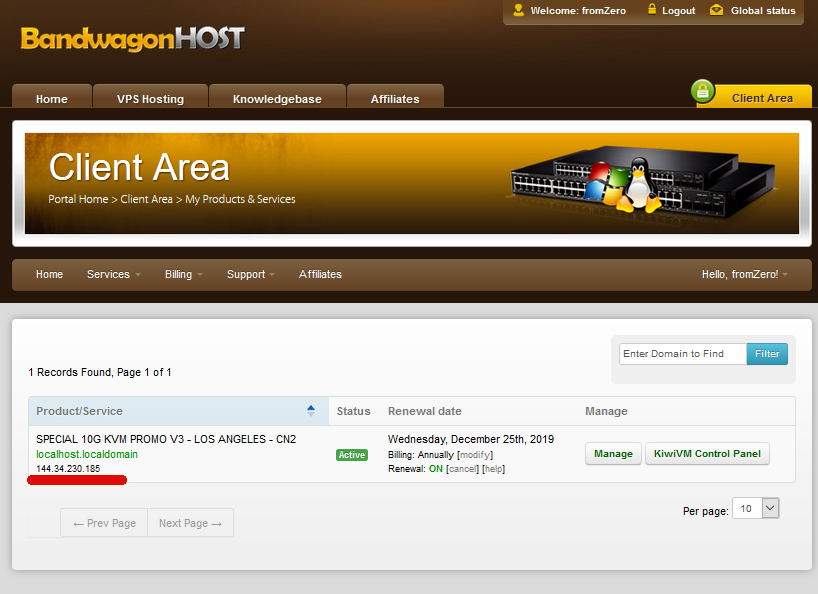
Next go to Step #3 by clicking “KiwiVM Control Panel” button. Aha, I see my IP address here as well.
Great! Now I make sure I change my KiwiVM Control Panel Password to the one I can remember before I Log off 🙂
Comment from a Senior Linux Engineer
Strictly speaking, you are not required to set a KiwiVM password. You could always use “KiwiVM Control Panel” button in the “Client Area” to log into KiwiVM.
You may want to set a KiwiVM password for convenience (so you can login to KiwiVM without first logging into Client Area), or to share KiwiVM login information with your colleagues without having to give them access to the entire Client Area.
6. Install Centos 7
As a beginner, I’m Googling all my answers. I don’t even know what Centos 7 is… laugh or cry… They say to install it to avoid future trouble with my website.
Comment from a Senior Linux Engineer
It was my recommendation to use CentOS-7 due to the fact that CentOS-6 EOL (End of life) is in 2020.
We prefer using CentOS for simple tasks such as website hosting due to the fact that updates to CentOS very rarely break things. In our experience you can set everything up on a CentOS machine and not touch anything literally for years (besides OS updates). This cannot be said about Ubuntu or Debian OS as these OS do not always update smoothly, and generally have shorter update cycles.
If you are an experienced Linux user, both Ubuntu and Debian can be a better choice, but be prepared to perform more maintenance tasks in general.
So, let’s do it.

The system begins the installation. Make sure to save the Root Password shown.
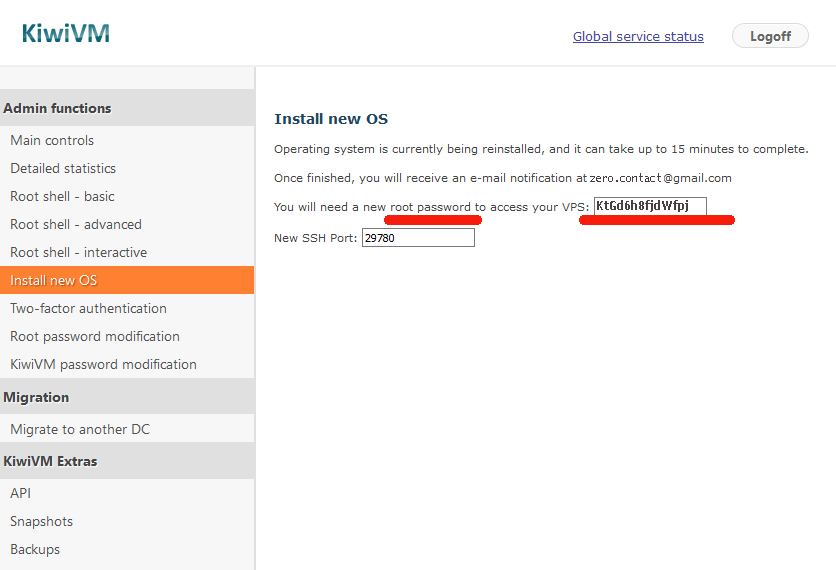
Agggrrrr… It’s another password to have! Not sure about you, but I’m overwhelmed and confused enough.
To spare you frustration with passwords, here is the summary of all passwords you’ll need:
7. All Passwords you’ll need to Remember. There are 3 of them:
Password #1. Client area Log in and Password
Gets you into your Client Area, where you buy & renew all your VPS services:
 |
 |
It can be changed in the Client Area (under your profile).
Password #2. Control Panel Log in and Password
Gets you into your VPS Control Panel where you manage & “talk” to your VPS:
 |
It can be changed in the KiwiVM Control Panel (under “KiwiVM Password Modification”).
Tip: Use auto-login from Client Area to access KiwiVM Control Panel (in the Client Area, Navigate to Services -> My services. Click “KiwiVM Control Panel” button).
Password #3. Root Shell Log in and Password
Gets the root access (“inside access”) to your VPS where you talk to you VPS and execute Linux commands.
 |
 |
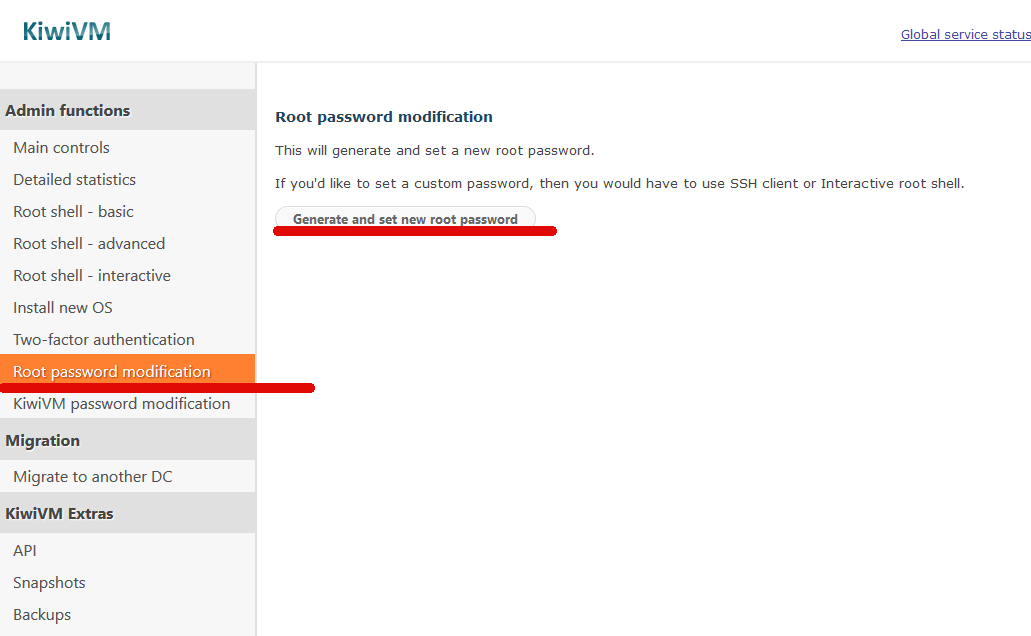
It can be changed in the KiwiVM Control Panel (under “Root Password Modification”).
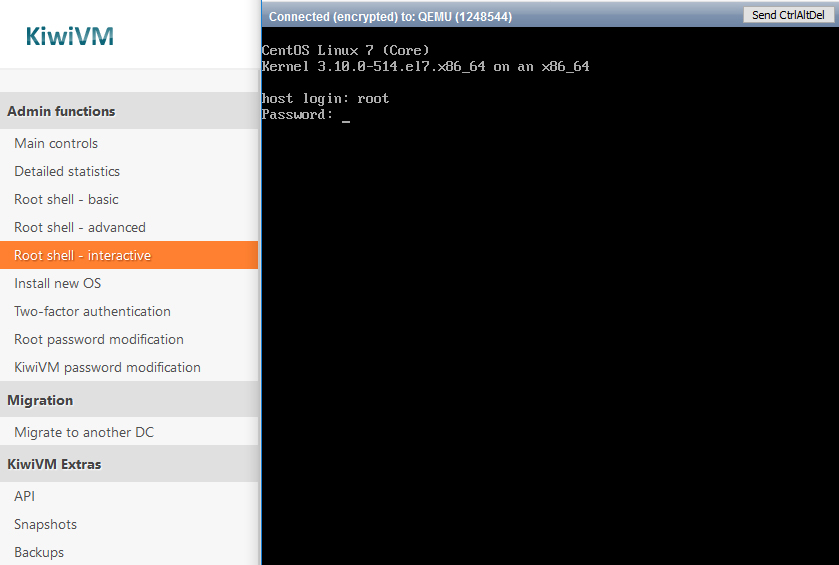
8. Talking to VPS via Root Shell Interactive. Log in.
Let the fun begin… Let me remind you it’s my very first VPS and Linux ever. Here we go. The Root Shell is the place where we will send all Linux commands. Root Shell Interactive greets us with the login line. How to log in?
Type in word: root and press [Enter]

Where to get password?

We saved it in Step 6. Otherwise you can always reset it again in KiwiVM Control Panel as follows:
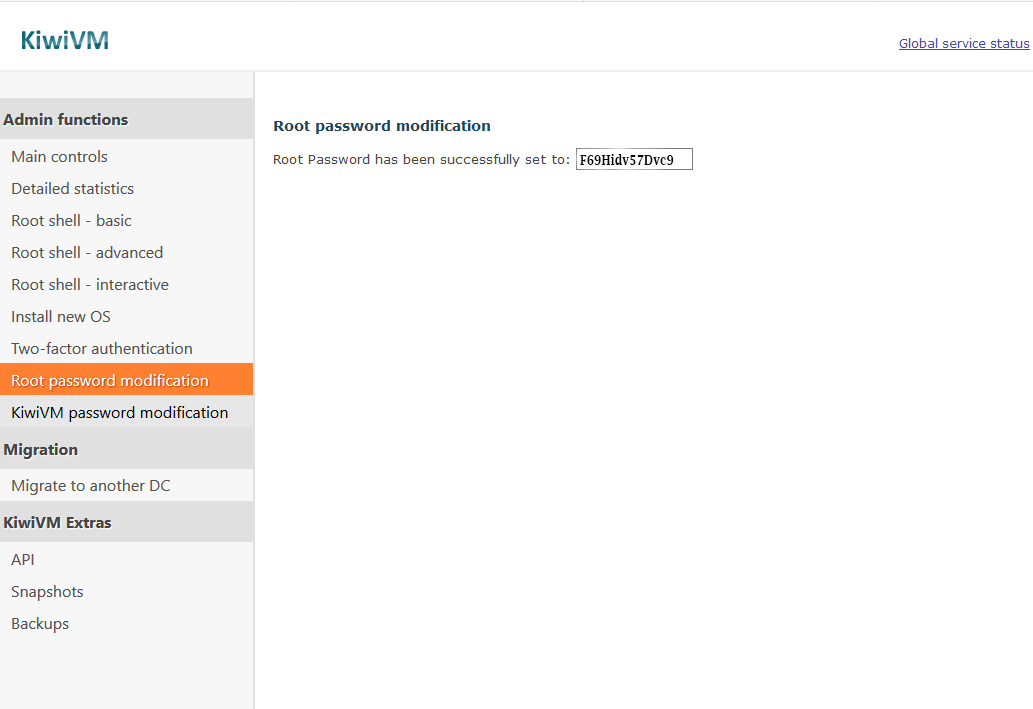
Here is the successful password modification result:
Now go ahead and type it in. Note, you cannot Copy & Paste anything in Linux… So the password is to be entered manually (make sure to respect the Upper case letters). In addition, as you type in the password, it won’t be show on the screen, kind of blind typing.. Once finished, press [Enter]. So, after every command line, you press [Enter]. That’s default rule to remember.
Comment from a Senior Linux Engineer
Lack of copy+paste support is the limitation of the Interactive root shell. We recommend using Putty (SSH Client application) to connect to your VPS shell which as Putty does support copy+paste. Ideally, you should be using passwordless SSH authentication (via public/private keys), though setting this up can be tricky for a novice user.
9. First Linux practice (can be skipped) – Change the root password in Linux
Remember that awkward root password we had to type in just now? Let’s change it to a better one.
Type in: passwd and press [Enter]

Now type in your new password (you won’t see the letters as you type). Press [Enter], then re-type it again as prompted. Press [Enter] again.

If successful, you should see the message: “passwd: all authentication tokens updates successfully.”

Well done! You’ve just completed your first Linux task!
Comment from a Senior Linux Engineer
PLEASE do not set easy to crack passwords, as this will result in hacking activity. A good password has uppercase/lowercase letters, numbers etc. You’ve probably heard this a million times already, but this rule applies here as well.
P.S. Root passwords generated by KiwiVM are relatively strong and are not saved in our system; if you do not absolutely have to change them, consider leaving them as is.
10. Linux System Update
First thing first – update your system packages. Type in: yum update and press [Enter]

Wait and see lots of data rolling on the screen until you finally see message similar to this: “Total download size: 100M Is this ok [y/N]:”
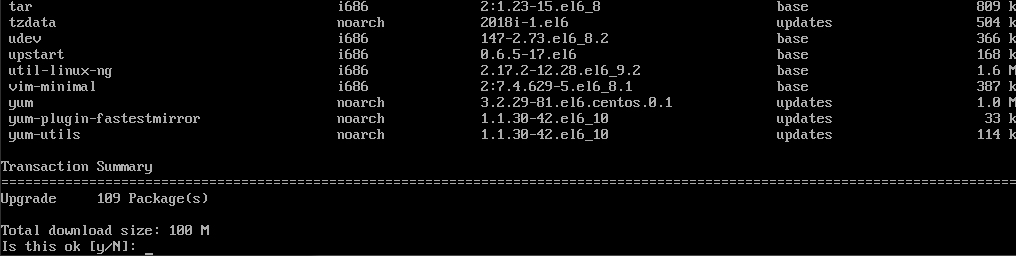
Nice question, how can I tell? Hope it is ok 🙂 Let’s agree, and say “Yes”. Type in: y and press [Enter]. Here it started downloading packages… Caught the screen as follows:
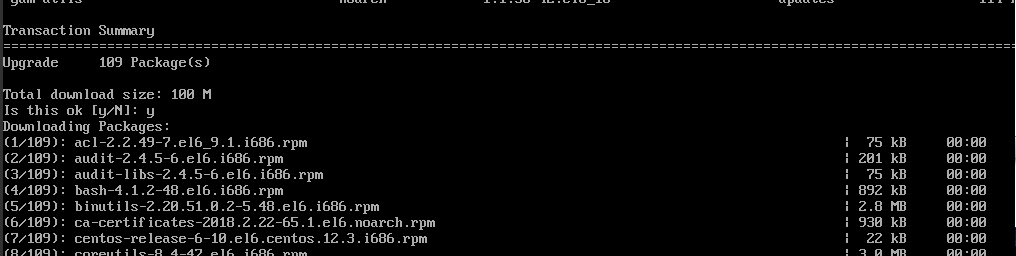
And finally as it finishes updating you’ll see “Complete!”
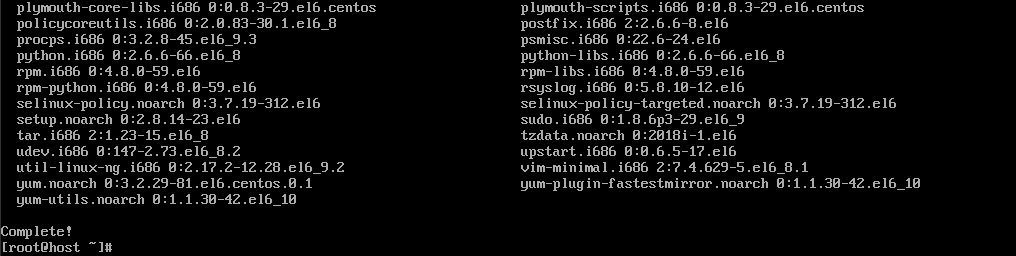
Now reboot the system. Type reboot and press [Enter]

… now wait… (until prompted to log in), then login again.
11. Installing Apache, MySQL, PHP 7
Even though you might not know (just like me 🙂 what they’re for exactly, you need them all to be installed.
11.1. Install Apache and MySQL
Type in: yum install httpd mariadb mariadb-server


Alright, familiar prompt ending with “Is this ok [y/d/N]:” Type y and press [Enter]. See the message: “Complete!”
So far it’s been fun! 🙂 Now enable and start Apache: Type systemctl enable httpd

Type systemctl start httpd

If there is no error or messages given, then it’s all good. Otherwise you’ll see an error message.
Now enable and start MySQL: Type systemctl enable mariadb

Type systemctl start mariadb

Again, if there is no error or messages given, then it’s all good. Otherwise you’ll see an error message.
11.2. Install PHP 7
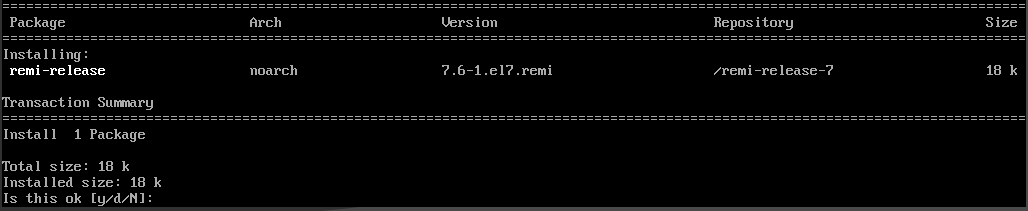
Type yum install https://rpms.remirepo.net/enterprise/remi-release-7.rpm

Receiving a familiar prompt. Press y and [Enter]
Type
yum –enablerepo epel –enablerepo remi-php72 install php php-cli php-gd php-curl php-mysql php-zip php-xml php-mbstring

Receiving a familiar prompt. Press y

Followed by another prompt. Press y

Receive message “Complete!” Type systemctl restart httpd

Done.
12. Set up MySQL
12.1. Important: Securing mysql
Has to be done to prevent hacking… in other words, so that it can only respond to my commands, and ignore the rest of the world.
Installing the editor to help us with this. Type yum install mc

Press y

Type mcedit /etc/my.cnf.d/myconfig.cnf
Note the Space symbol after mcedit, see my first attempt below resulting in error, followed by second correct one.

In the blue window we landed, type in
[server]
bind-address=127.0.0.1
bind-address=127.0.0.1

Save this by pressing F2, then exit by pressing [Esc] two times
Type systemctl restart mariadb

Yay 🙂 I’m so excited about my Linux achievements so far!
Comment from a Senior Linux Engineer
At this point you probably wonder, why we are not setting up a separate MySQL user? Every single MySQL guide on the internet goes over creating a user, flushing privileges, etc, which is usually causing quite a bit of grief. However in many cases this is simply not needed.
Furthermore, it may give you a false sense of security. Creating a MySQL user with a stong password is a generally good thing, but MySQL has many more attack points to consider.
From security standpoint, in a single-tenant application (single user on a VPS, single website etc) the only thing you need to do is prevent MySQL from speaking with entire Internet, which is achieved via the myconfig.cfg file above. Once this is done, most potential security issues related to MySQL become completely irrelevant.
See additional comment about MySQL user and password at the very bottom of the article.
12.2. Create Mysql database
Type mysql -e “create database yourdatabasenamehere”
(important: don’t forget the “”). My database name is called allbrokers.

Done. Congratulations to myself (and to you getting here)!
13. Check IPtables
Type iptables -L -n

Result: 
All good. Nothing extra needs to be done here. Your VPS is all set. This concludes work to be done in Linux Interactive panel.
Comment from a Senior Linux Engineer
Contrary to popular belief, setting up firewall rules on a single-tenant VPS does not provide much protection (besides false sense of security).
Carefully designing firewall rules in a multi-tenant environment is important, however for novice users running a single-tenant environment there are very limited circumstances where configuring iptables may help (and not break anything).
If your VPS is hacked, no amount of firewall rules will prevent abuse. This is because once your VPS is infected, the malware has full control over entire OS, this includes firewall. We recommend focusing your efforts on other security aspects like updating your OS and website scripts on a regular basis, not using simple passwords, and not have software obtained from questionable sources running on your VPS.
Additionally, as mundane as this may sound, do keep your home PC fully updated and have an anti-virus software in place. We have seen countless cases of users unknowingly running malware on their PCs which would connect to your VPS and infect it without their knowledge. In our experience, following this advice alone would have prevented at least half of the security issues our customers face on a regular basis.
14. Point your website domain to your VPS
To do this, we need to create an “A record” for your website domain. This is done at the place where you registered your domain, e.g. with your domain registrar. (The “A record” will point your domain name to your IP address, e.g. tie them up together, so that when the domain name is being requested on the Internet, the name sever will know which IP address so send it to). I’ve registered my domain via Hover.com. Let’s go to their website.
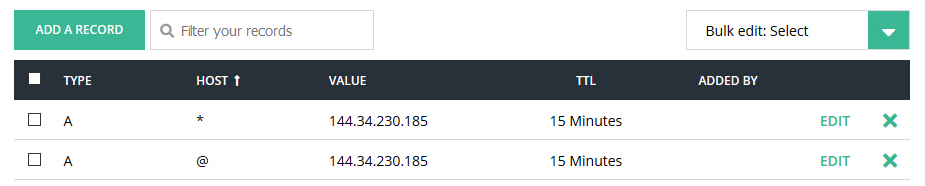
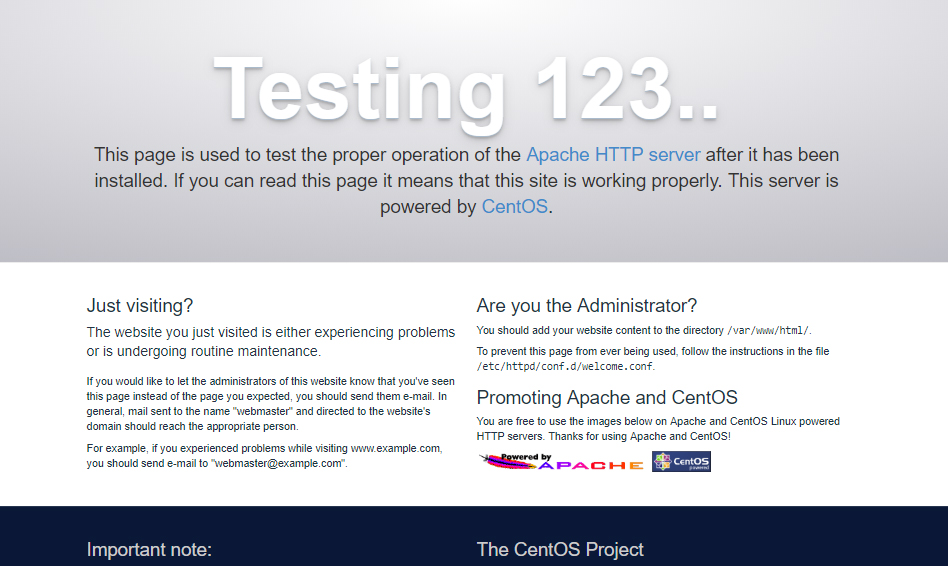
We change the field with * (common) And we change the field with @ (other registrars might have it left blank) In the IP field now add the IP if your VPS. Within the next 15 minutes (default TTL time set alongside your DNS record) go to your website in browser to see the Apache Welcome page. This means we have successfully created the “A record” and successfully installed Apache.
Comment from a Senior Linux Engineer
Depending on your domain name registrar, DNS propagation may take up to few days. If you are having issues with pointing domain name to your VPS, please contact your domain name registrar and they will be able to guide you through this process. Additionally, you could simply use your VPS IP address instead of the domain name to test your website, like this:
http://11.22.33.44/
And you will see the same content in the browser as if you were accessing your domain name.
15. Load your website files to your VPS
This must be the most exciting part. At last! The files are to be uploaded to public_html folder. How exactly to bring them there? By using file manager. I was suggested to try such software as: Far Manager (though not very popular), otherwise WinSCP (recommended), otherwise FileZilla.
Let’s google WinSCP. It leads us here: https://winscp.net/eng/index.php
I’m downloading it now. Now run the downloaded .exe file. Use all default presets and click Install.
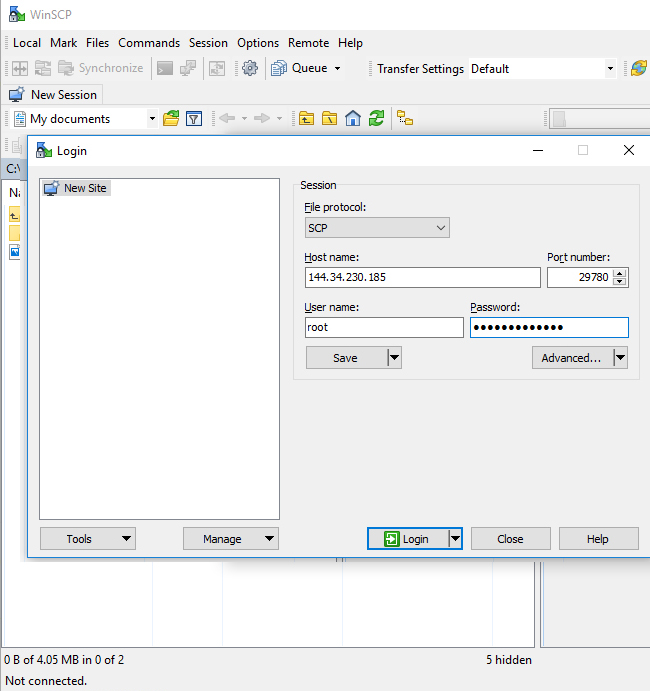
File protocol : SCP
Host name: IP address of your VPS
Port number: SSH Port found in Main Controls in KiwiVM (same page where the IP address is)
Username: root
Password: your Root Shell Password (Password #3 in my collection of passwords above).
Password, if forgotten, can be obtained via “Root Password Reset” in KiwiVM Control Panel.
Once you log in, you’ll be able to simply drag files from left window (your PC) to right window (your VPS).
It’s a GREAT SUCCESS! Congratulations to me and to everyone setting you first website on Linux VPS!
P.S. Have you uploaded your website to the “/root” folder? That’s what I initially did, of course. Newbie with the capital letter. The default starting place to upload your website files is: /var/www/html
To test that you entire vps setup works, create a simple file called index.html inside /var/www/html folder and write “IT WORKS!” inside the file and save it. Then visit www.yourwebsitenamehere.com/index.html you should see “IT WORKS!” and then you smile :)))
Comment from a Senior Linux Engineer
If you followed this guide, you probably wonder what login/password use for MySQL access. The login is “root” with empty password. See security note in section 12 regarding this approach.
16. Setting up a .htaccess File
This step will be needed in order for your website to function properly, e.g. be able to write and re-write “things” as needed, instead of showing 404 errors.
Type mcedit /etc/httpd/conf/httpd.conf
Scroll to find the section that reads <Directory /var/www/html>
Now in this section, after AllowOverride, replace the word None with the word All

Save this by pressing F2
Then exit by pressing [Esc] 2 times
Restart Apache to apply changes.
Type systemctl restart httpd
This should now make your website fully functional.
P.P.S if your script needs to write files to a specific folder, but can’t access it for whatever reason (just like my Drupal now can’t even begin installation, and is begging for writing access).
To fix this, type the following command (must be done after all your website files are uploaded to your VPS server):
Type chown -R apache: /var/www
Fixed.
Incredible! I’ve finally set up my own website on Linux VPS!
The Happy End.
BandwagonHost Terms of Service
Terms of Service
By using or otherwise engaging any of the computer systems, services, resources, or facilities that we make available or otherwise provide to you (collectively, “services”), you agree to the following terms (this “ToS”), which will apply to all matters arising between you and us. In this ToS, unless the context requires otherwise, “us”, “we”, and “our” refers to IT7 Networks Inc., while “you” and “your” refers to the named account holder and user of our services.
Support
You certify and represent to us that you have sufficient knowledge to manage all aspects of a computer running a Linux-based operating system, on your own and without any assistance from us. The services we provide to you will be strictly managed by you at all times. Although we maintain and manage our servers and the software that we install on them (collectively, the “host server”), we will not install software on or manage the virtual private server (the “VPS”, which runs on the host server) that you access and use. In other words, we are only responsible for the host server, and we will not assist you with installing or configuring applications, troubleshooting, recovering from backups, etc. on the VPS that we allocate to you (“your VPS”) – these are solely your responsibility.
Backups
Our data storage system is fully redundant, which means that a failure of one component should have no effect on data integrity. However, we accept no liability or responsibility whatsoever for loss of or harm to any data of yours, nor for any damages you may suffer in connection with such loss or harm to your data. We strongly encourage you to implement your own backup solution and to periodically ensure that you can recover your own data.
VPS Service – Fair Share Policy
You are permitted to use all server resources that we allocate to you in connection with our services, with a few exceptions as described below.
Storage I/O
Please avoid situations where your VPS is constantly performing storage I/O operations at a rate over 100 MiB/s for prolonged periods of time (4+ hours). Should storage I/O usage exceed this value, we will inform you via email. Should storage I/O continue after such notification, we reserve the right to temporarily suspend service until this is resolved.
Central processor (“CPU”) resources
We allow you to use 100% of the CPU resources on your VPS for short periods of time. However, one-hour-average CPU load on your VPS should not exceed the maximum level permitted as per limits set out below:
5G Plan: 20% of 1 core
10G Plan: 25% of 1 core
20G Plan: 50% of 1 core
40G Plan: 75% of 1 core
80G Plan: 100% of 1 core
160G Plan: 100% of 1 core + 50% of 2nd core
320G Plan: 100% of 2 cores
480G Plan: 100% of 3 cores
640G Plan: 100% of 4 cores
960G Plan: 100% of 6 cores
1280G Plan: 100% of 8 cores
3G/128M Promo plan: 10% of 1 core
5G/256M Promo plan: 14% of 1 core
5G/512M Promo plan: 17% of 1 core
30G/4G RAM Promo plan: 50% of 1 core
V3 10G/512M Promo plan: 17% of 1 core
V3 20G/1G Promo plan: 25% of 1 core
V3 40G/2G Promo plan: 50% of 1 core
V3 80G/4G Promo plan: 100% of 1 core
V3 160G/8G Promo plan: 100% of 1 core + 50% of 2nd core
V3 320G/16G Promo plan: 100% of 2 cores
V3 CN2GIA 10G/512M Promo plan: 50% of 1 core
V3 CN2GIA 20G/1G Promo plan: 100% of 1 core
V3 CN2GIA 40G/2G Promo plan: 100% of 1 core + 50% of 2nd core
V3 CN2GIA 80G/4G Promo plan: 100% of 2 cores
V3 CN2GIA 160G/8G Promo plan: 100% of 3 cores
V3 CN2GIA 320G/16G Promo plan: 100% of 4 cores
V5 CN2GIA 20G/1G Promo plan: 100% of 1 core
V5 CN2GIA 40G/2G Promo plan: 100% of 1 core + 50% of 2nd core
V5 CN2GIA 80G/4G Promo plan: 100% of 2 cores
V5 CN2GIA 160G/8G Promo plan: 100% of 3 cores
V5 CN2GIA 320G/16G Promo plan: 100% of 4 cores
V5 CN2GIA 640G/32G Promo plan: 100% of 6 cores
V5 CN2GIA 1280G/64G Promo plan: 100% of 8 cores
V5 HONG KONG 40G plan: 100% of 1 core
V5 HONG KONG 80G plan: 100% of 2 cores
V5 HONG KONG 160G plan: 100% of 3 cores
V5 HONG KONG 320G plan: 100% of 4 cores
BETA KVM Plan: 20% of 1 core
2018-11-11 CN2 Special V3 plan: 50% of 1 core
2018 Black Friday CN2 Special V3 plan: 25% of 1 core
2018 Black Friday CN2 GIA Special V3 plan: 25% of 1 core
2018 Cyber Monday Special V3 plan: 50% of 1 core
2018-12-12 CN2 DC8 Special V3 plan: 25% of 1 core
Limited edition plans: 30% of 1 core
If your VPS exceeds hourly average limits as set out above, the CPU resources available on your VPS will be automatically limited to a level as set out above. In other words, your VPS will not be able to use more CPU resources than permitted under your current plan. A notice should appear on the main screen of the KiwiVM control panel for your VPS if you encounter this CPU limit. Once the CPU resources used by your VPS are reduced to the level permitted under your current plan, the aforesaid limitation on CPU resources will be automatically lifted. We do not impose any other limitations on CPU usage; you are allowed to use as much CPU as your VPS allocates and we will not suspend or limit our services further than stated.
Acceptable Use
Thank you for spending the time to read this ToS – we really appreciate your effort. You may use coupon code “ireadtheterms8” when ordering our services to receive a small discount. However, please be sure to read on…
We do not tolerate the following activities on our servers:
- Spamming (including unsolicited email, search engine spam, doorways, form spamming, etc.);
- Mass mailing of any type (including double opt-in) – only occasional/incidental transactional emails are allowed to be sent from our network;
- Denial of service (“DoS”) or other attacks (whether outgoing or incoming);
- Hacking (including situations where a VPS was hacked);
- Distribution of malware/viruses, with or without your knowledge;
- Port scanning;
- Cryptocurrency mining, as well as decentralized storage/computing services which are associated with cryptocurrency (like bee swarm etc);
- IRC activity (client, server, bot, etc.);
- Distribution of trademarked or copyrighted content (e.g. mp3s, movies, etc.) that you do not own or have a valid license to distribute – we honor all DMCA complaints;
- Cracked software, unauthorized replicas, counterfeit and illegal items, and the like, and links to such content;
- BitTorrent (trackers, clients, files, links, etc.);
- Nested virtualization (e.g. running Qemu) – Docker is a permitted exception;
- Open proxy servers (due to abuse committed through open proxies);
- Open DNS resolvers, open port mappers, open NTP servers available via UDP protocol (due to DoS amplification attacks);
- Tor relays and exit nodes;
- Pornography and other sexually explicit content;
- Data mining, crawling;
- KiwiVM API abuse (e.g. making excessive or unjustified API calls); or
- Using abusive language towards our employees, spamming our support ticket queue with the same question or issue, threats of any kind, and any other conduct we reasonably deem unacceptable.
The foregoing are just examples of our overriding policy that you may not abuse our services. If we determine that you are in breach of our reasonable policies (including but not limited to those described in this ToS), we may suspend our services to you indefinitely (in which case a brief explanation will be posted automatically to the KiwiVM control panel on your VPS). In that case, we may, at our discretion, restore our services to you if you acknowledge that your actions have contravened our policies and we are satisfied with your plan to correct your actions. Such resolution to the suspension of our services may occur in the KiwiVM control panel without involving our technical support resources.
Without limiting the foregoing, repeat infractions of our policies may incur a $50 administration fee per incident, and may further entail suspension of all our services under your account until this fee is paid.
If we temporarily suspend our services to you more than once in the same calendar year, we may immediately suspend service to you until January 1st of the next year. The number of suspensions that will lead to such extended suspension may vary between 3 and 100 depending upon the nature of the infraction. We use an abuse scoring system to weigh infractions, and you will be able to see your current abuse score in the KiwiVM control panel upon service suspension.
Note that we block traffic to/from port 111 on our network to prevent security issues related to traffic on this port.
Accounts
You are the account holder with us, and each VPS you use represents a separate service. We will only provide services to you if we have your real name and valid and sufficient contact information for you. We may suspend or terminate our services to you at any time if your contact information contains invalid information (e.g. incorrect name, address, phone number, etc.). We may seek to verify your contact information with third parties, and may request sufficient clarification from you and from third parties in case we are unable to verify your contact information.
We do not allow assignment, sale, or transfer of customer accounts from one person or entity to another. You have no right to assign, sell, or otherwise transfer your rights under this ToS to anyone.
Cancellations and Refunds
Notwithstanding anything else set out in this ToS, we may in our sole discretion terminate our services to you at any time without cause. In the event that we exercise this right, we will provide you with a refund for any unused services that you have already paid us for.
You may cancel service renewal at any time in the billing portal.
You may request a refund of your payments to us, provided that all of the following conditions are met:
- Your account was created 30 or fewer days ago
- Your account with us is in good standing (i.e. there are no overdue amounts owing) and there have been no violations of this ToS;
- None of your payments to us have been previously been or currently are disputed or charged back;
- None of the IP addresses assigned to your VPS are on any blacklist or blocklist, and none of those IP addresses were previously replaced by us due to blacklisting;
- The monthly data transfer usage on your VPS is under 10% of your monthly quota;
- The number of services (active or cancelled) under your account is 3 or fewer;
- The sum of all payments you have made to us is $100 or less and the total number of payments you have made to us is 10 or fewer; and
- You have not previously received a refund under a different account.
When a refund is requested and all the foregoing conditions are met, we will do the following:
- Provide a full refund of payments made towards the account, starting from the time the account was created, with the exception of payments for IP address changes (if any);
- Immediately terminate all services under the account; and
- Immediately and irreversibly delete all data, snapshots and backups associated with the account.
Refunds will only be issued in the original form of payment. After a refund is processed, the relevant account may be used for future orders, but it will not be eligible for any further refunds.
Refunds can be requested here: https://bandwagonhost.com/knowledgebase/4/Refunds.html
Blacklists
We actively monitor our IP address space and we test each IP address before assigning it to a VPS, to make sure each new VPS is delivered with a clean IP address. Therefore, we will not issue a refund when any IP address assigned to a VPS gets blacklisted.
Be aware that if an IP address assigned to your VPS is blacklisted, it will be impossible to use the “Datacenter Migration” feature in the KiwiVM control panel until that IP address is no longer on any blacklists for at least 7 consecutive days.
Chargebacks and Paypal Disputes
Please do not file or lodge a dispute with Paypal in order to get a refund, as this will prolong the process and create more work for you and for us.
Initiating a chargeback or a Paypal dispute will result in the immediate suspension of our services to all accounts under your name and, at our discretion, any other associated accounts, until the dispute is resolved. Additionally, we may charge you for any chargeback fees we incur, and for any time we spend dealing with the dispute (e.g. time spent locating and suspending affected services, communicating with payment processors and banks, dealing with your support tickets, etc.). In such cases, we will bill $40 per hour in 15-minute increments, and our services to you will not be resumed until your account is paid in full.
Data Protection
We may share your personal information with third parties in the following circumstances:
- In order for us to assign an IPv4 or IPv6 address to your VPS, we will submit your personal information to the appropriate regional internet registry; and
- If there is a payment transaction inquiry by a third-party payment processor, we will share your information with the payment processor used to process your order for our services.
In no other case will we share your personal information with third parties unless we are required to do so by law. We truly appreciate you reading this far. Use coupon code “ireallyreadtheterms8” when ordering services to get a small discount.
Affiliate Program
Participation in our affiliate program is optional.
If you choose to participate in our affiliate program, these rules apply to you:
Affiliate links must be followed naturally by real individual users of a website who are not paid to follow the links. You may use URL shortening or URL masking techniques to hide affiliate links, however, your users must follow each affiliate link naturally and not as the result of confusing or misleading information. We may review the use of our links to make sure you comply with our policies. If we are unable to verify the source of visitors to our website through affiliate links you use, we may refuse your requests to withdraw funds.
The following practices are strictly forbidden and will result in a permanent ban from our affiliate program:
- Cookie-stuffing (i.e. loading affiliate links by using an invisible image) and similar techniques;
- Any activity that artificially increase visitors to our affiliate links (e.g. click and pageview exchange services);
- Mentioning our affiliate links in any type of unsolicited communication, potentially including email, forum posting, private messaging, instant messaging, etc.;
- Using affiliate links to order service for yourself or your family, or on behalf of someone else; and
- Offering cash back or any other monetary incentive to visit affiliate links.
If, in our sole discretion, we determine that you have violated our affiliate link policies, we may suspend our services to you and refuse your requests to withdraw funds.
Commission payouts under $1000 will be provided via Paypal. For amounts over $1000, we may make a payouts via Paypal or via bank (wire) transfer at our discretion.
Limitation of Liability
Notwithstanding anything to the contrary in this ToS or any other agreement between us, we will have no liability whatsoever to you for any direct, consequential, indirect, special, incidental, punitive, or exemplary damages or losses, including but not limited to loss of business or business opportunities, loss of contracts, loss of use, loss from business interruption, loss of profits or revenue, or damage to business reputation, howsoever caused, and even if due to data loss, service interruption, negligence, or any combination thereof. Without limiting the foregoing, in the event that we are determined to be liable to you on any grounds, our total cumulative liability to you for all claims, damages, and causes of action arising from or relating to our services or this ToS or any combination thereof, howsoever caused, and even if due to data loss, service interruption, negligence, or any combination thereof, will not exceed the total cumulative dollar amount you have paid us in connection with your account.
Indemnification
Without limitation, you will defend, hold harmless, and indemnify us and our directors, officers, employees, agents and contractors from and against all actions, charges, claims, costs, damages, demands, expenses, losses, suits, and the like, including legal fees and costs, that arise in connection with our services or this ToS or any combination thereof, even if due to data loss, service interruption, negligence, or any combination thereof.
Legal Advice
You acknowledge that you had the opportunity to seek independent legal advice before using or otherwise engaging our services and thereby agreeing to this ToS.
Miscellaneous
You agree to pay us all amounts you ever owe us promptly and without delay, counter-claim, or set-off.
Nothing in this ToS binds us to deliver or continue to deliver our services to you. We make no warranties or representations of any kind, whether expressed or implied, with respect to our services. If delivery of our services is delayed or prevented for any reason beyond our control (including but not limited to law, decree, riot, war, strike, fire, flood, Act of God, and terrorism), then our services will be deemed suspended, without liability, for so long as that reason continues.
We may immediately suspend or terminate our services to you if we determine, in our sole discretion, that your use of our services violates this ToS or presents a security threat of any kind, including but not limited to security threats to our customers, our equipment, or our network. Any waiver of our rights or failure to insist on performance under this ToS will not be construed as a continuing or binding waiver and this ToS will continue in full force and effect.
This ToS and all business and other matters between us will be governed, construed, and enforced solely in accordance with the laws of the province of British Columbia and the federal laws of Canada applicable therein, without regard to any conflict of law or choice of law rules thereunder, and regardless of the location of you or us or any servers or other computers.
You and we agree to submit and attorn to the exclusive jurisdiction of the courts of the province of British Columbia, Canada. Without limiting the foregoing, any portion of this ToS that is prohibited or unenforceable in the jurisdiction where this ToS is enforced will, as to that jurisdiction only, be ineffective to the extent of such prohibition or unenforceability, but no further, without invalidating the remainder of this ToS, and such prohibition or unenforceability will not invalidate or render unenforceable any other portion of this ToS.
To the extent permitted by law, you waive any and all rights and remedies granted to you by any law, statute, regulation, or the like that would, in any manner, affect our rights and remedies or otherwise limit or alter this ToS.
This ToS will be interpreted with all changes to number and gender as the context requires. If you consist of more than one person, all of you will be jointly and severally liable.
This ToS and all documents and communications between us will be in English.
Time is of the essence of this ToS and all agreements between us.
This ToS will be enure to the benefit of and be binding on you and us and our respective successors and lawful assigns.
This ToS supersedes and replaces all prior versions of our ToS. We may, at our sole discretion, update and change this ToS at any time upon seven (7) days’ notice to you, and such updates and changes will be binding on you. Any notice to you in connection with this ToS will be delivered by email to the primary email address associated with your account.
Document last modified: 2020-02-25